Overview
The Attachments Upload Manager is triggered automatically when users add files from the camera, gallery, or file system. It provides real-time upload tracking, failure recovery options, and cancel actions for both individual and bulk uploads. Supported across all mobile screens with attachments, it ensures a reliable and consistent upload experience.

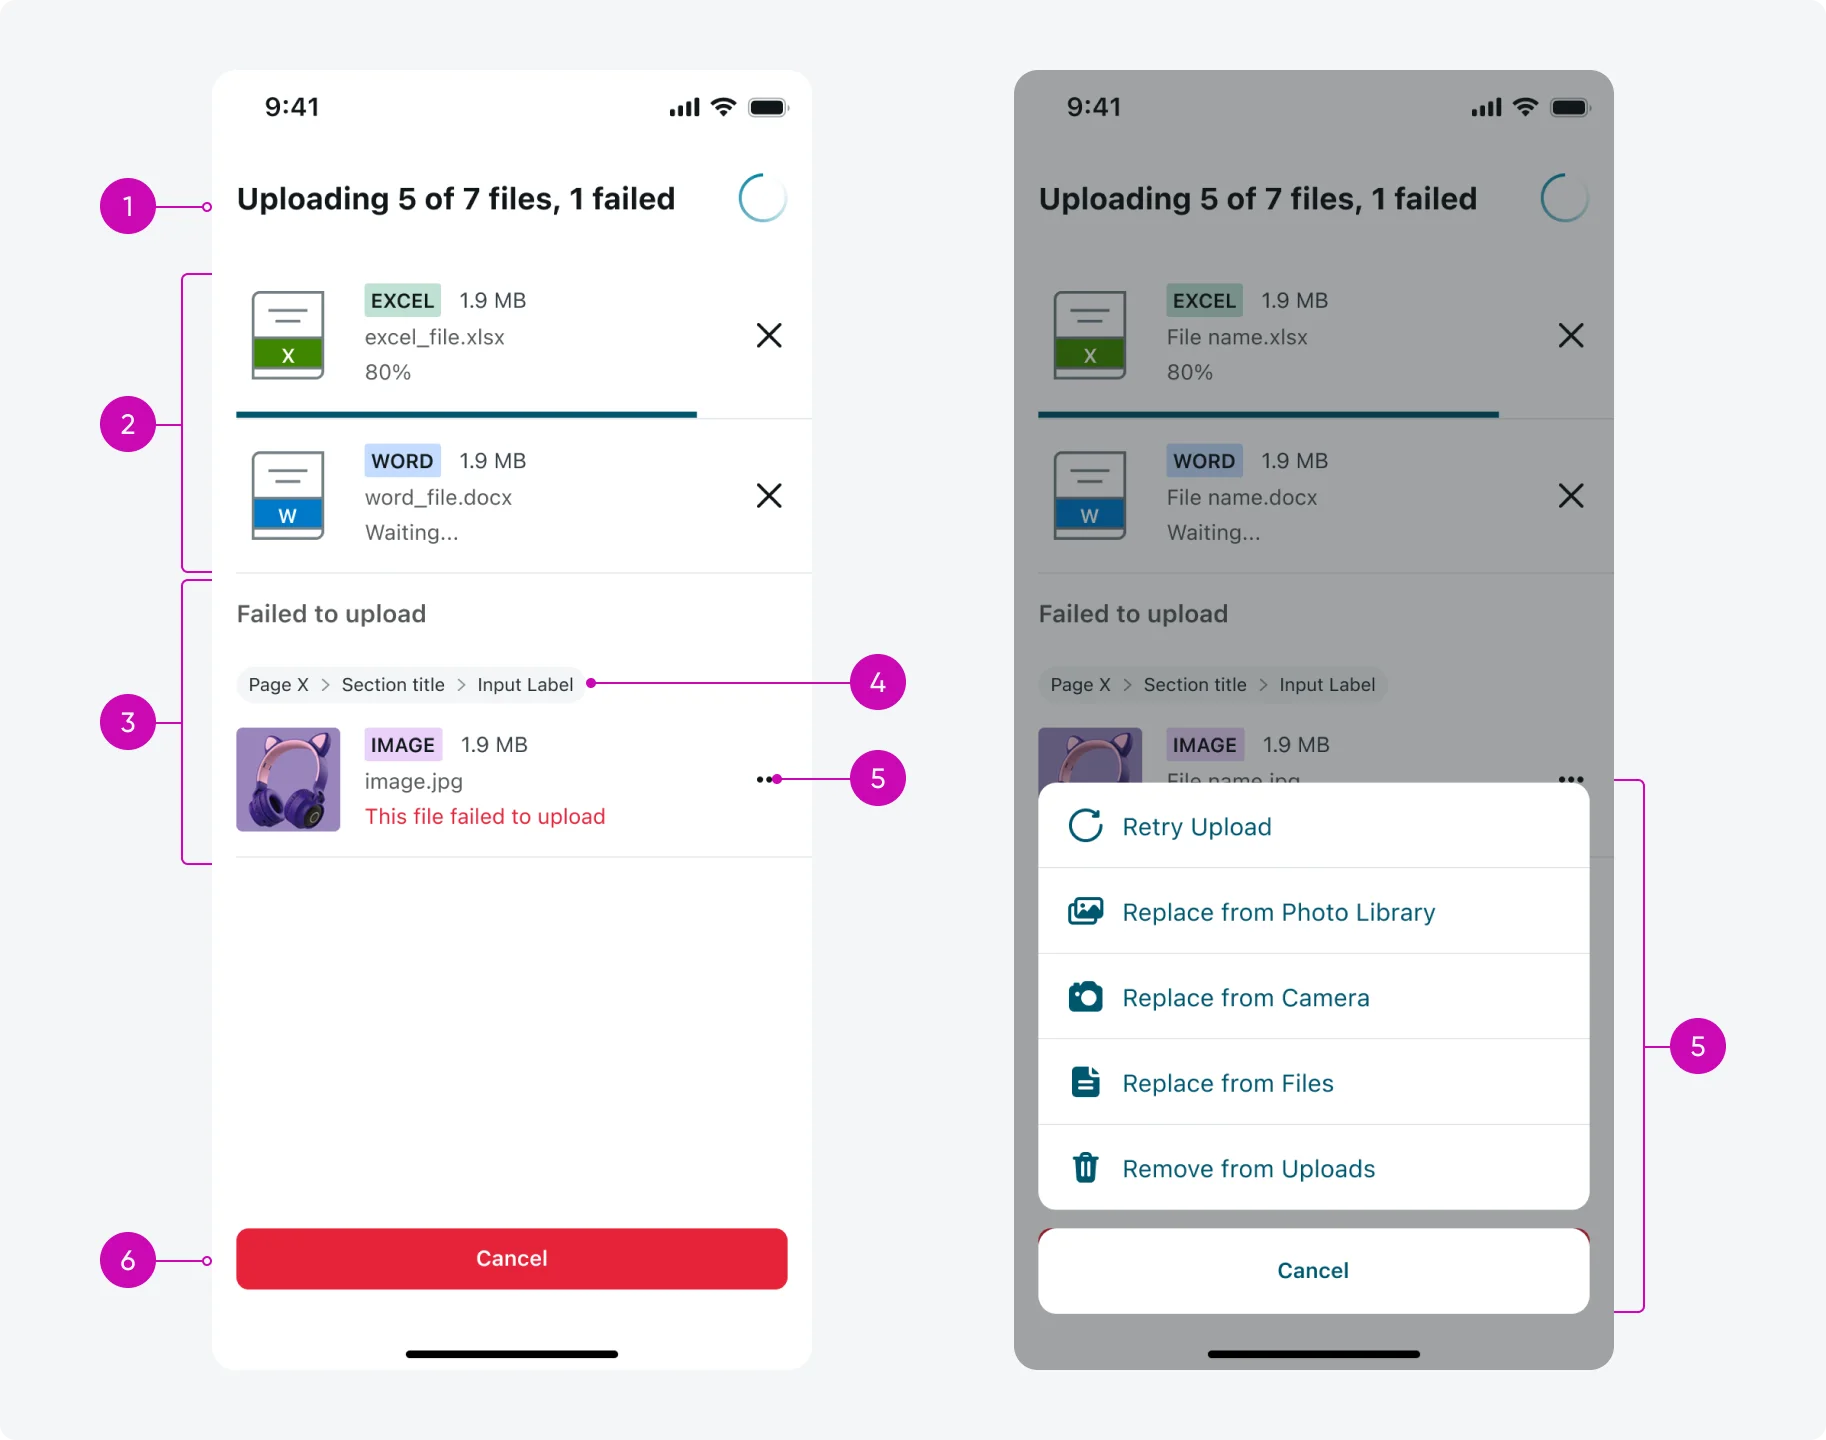
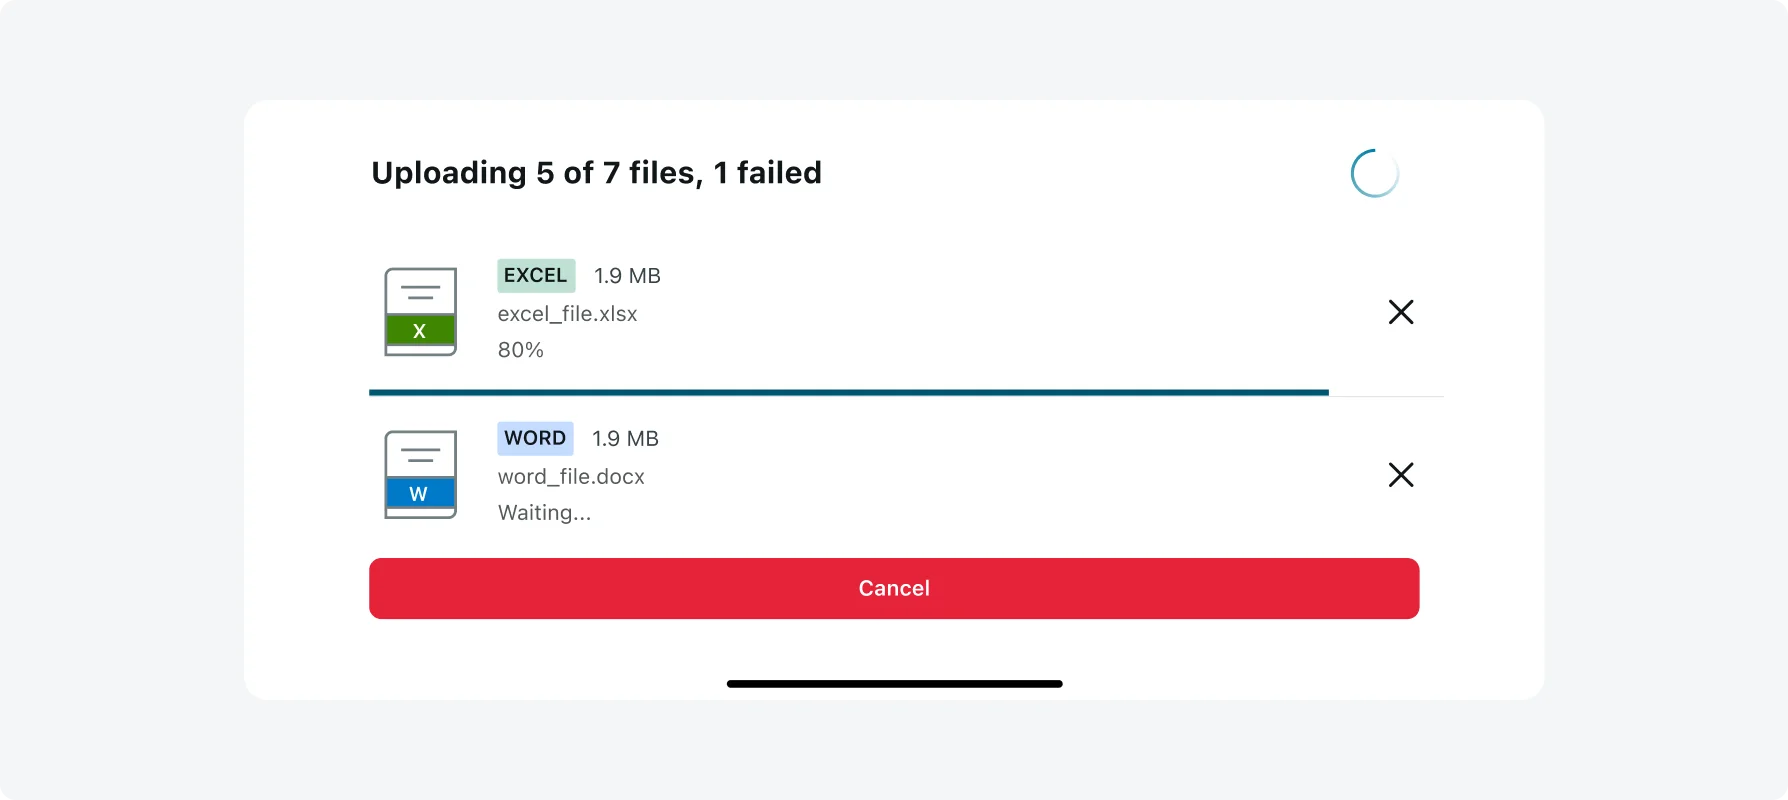
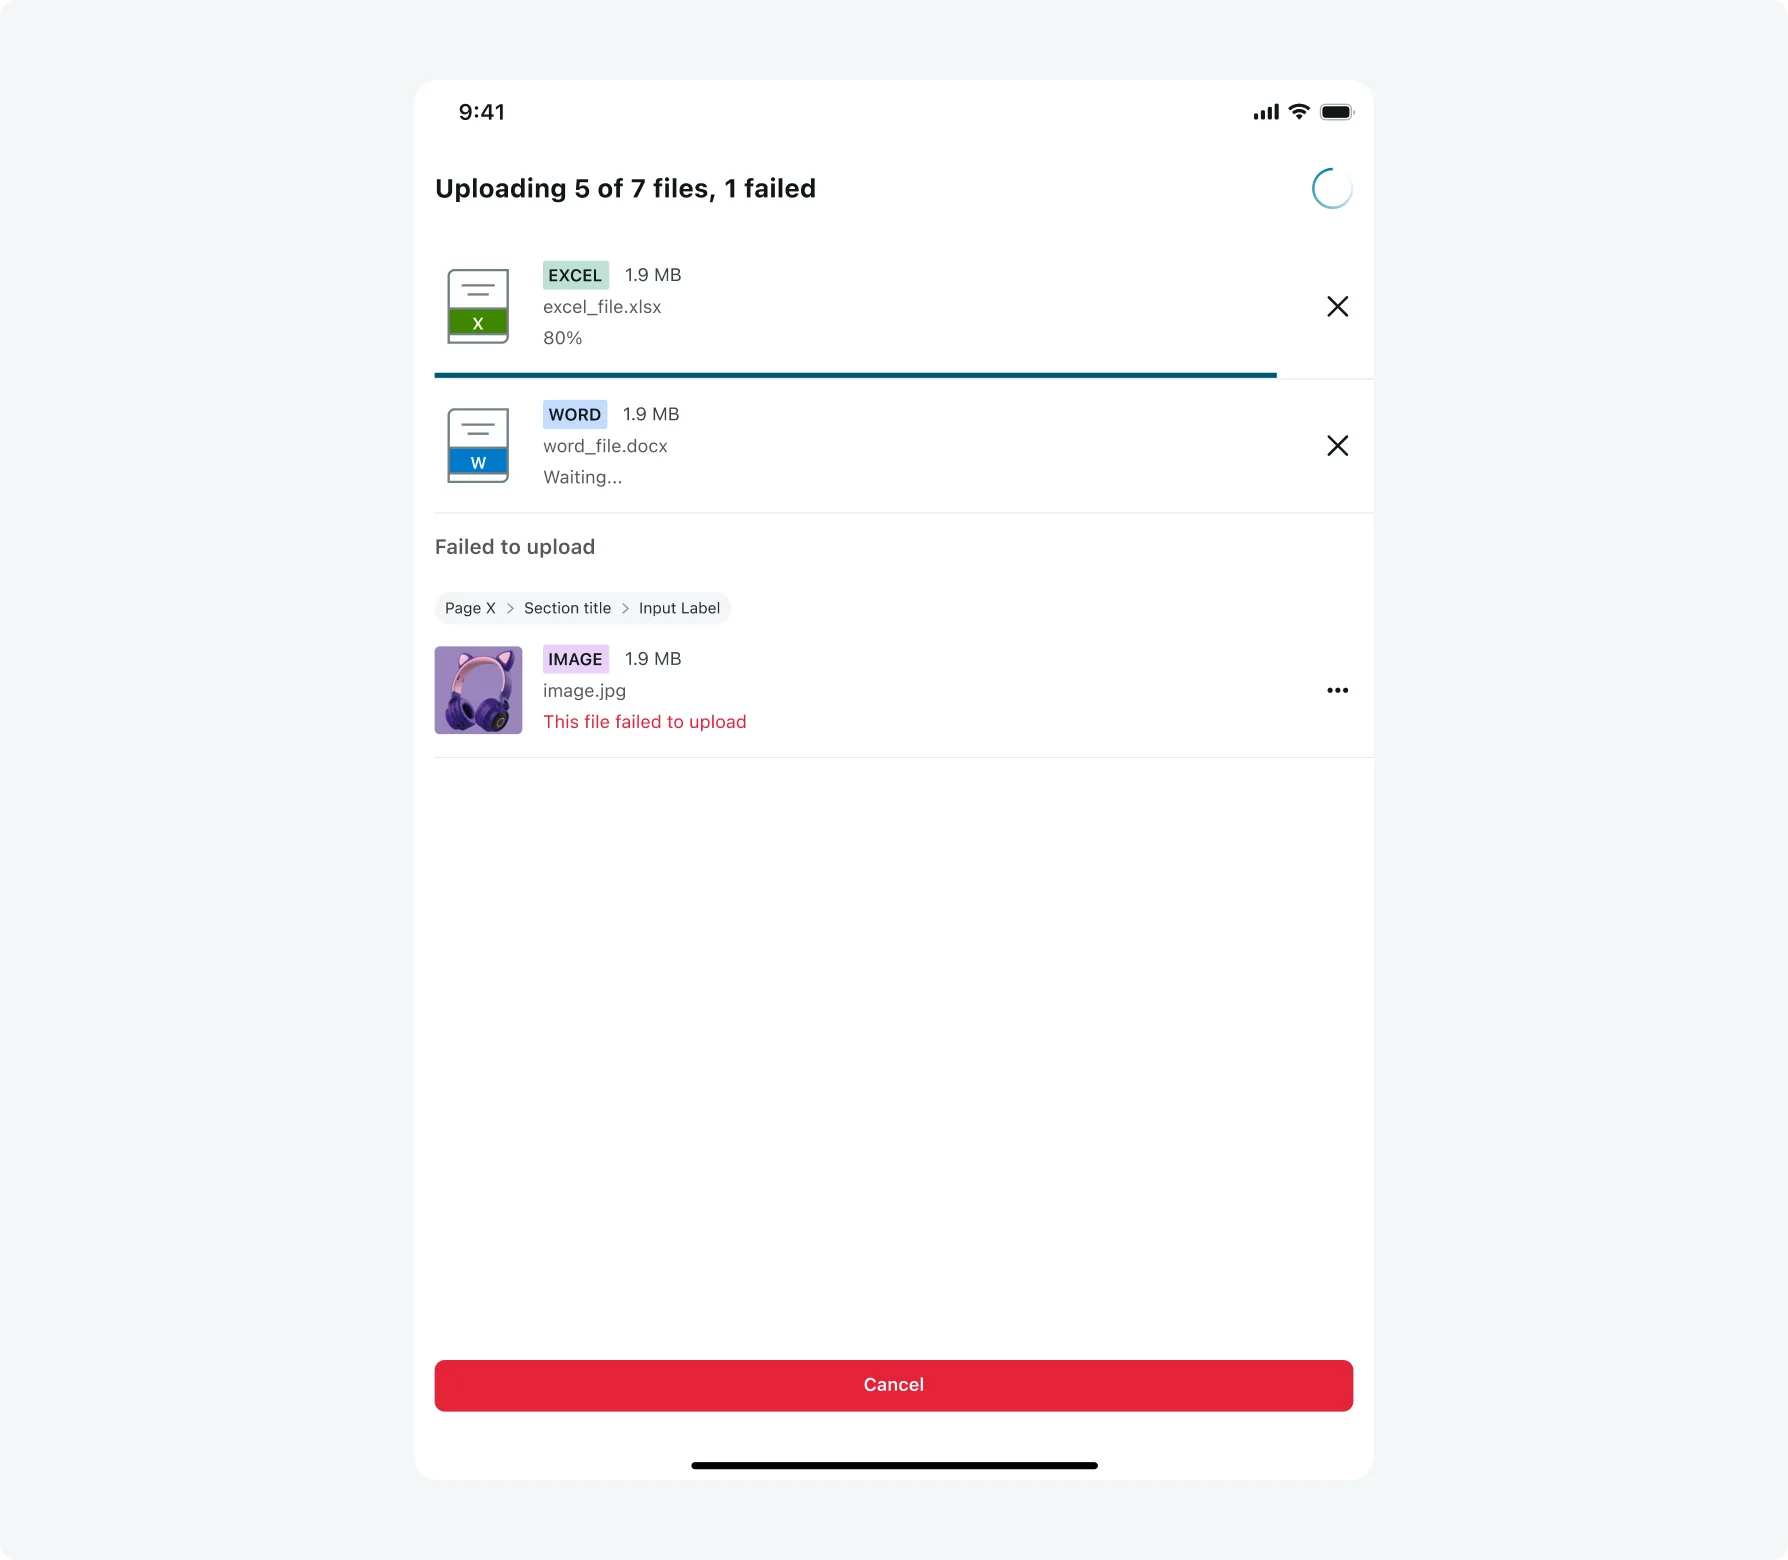
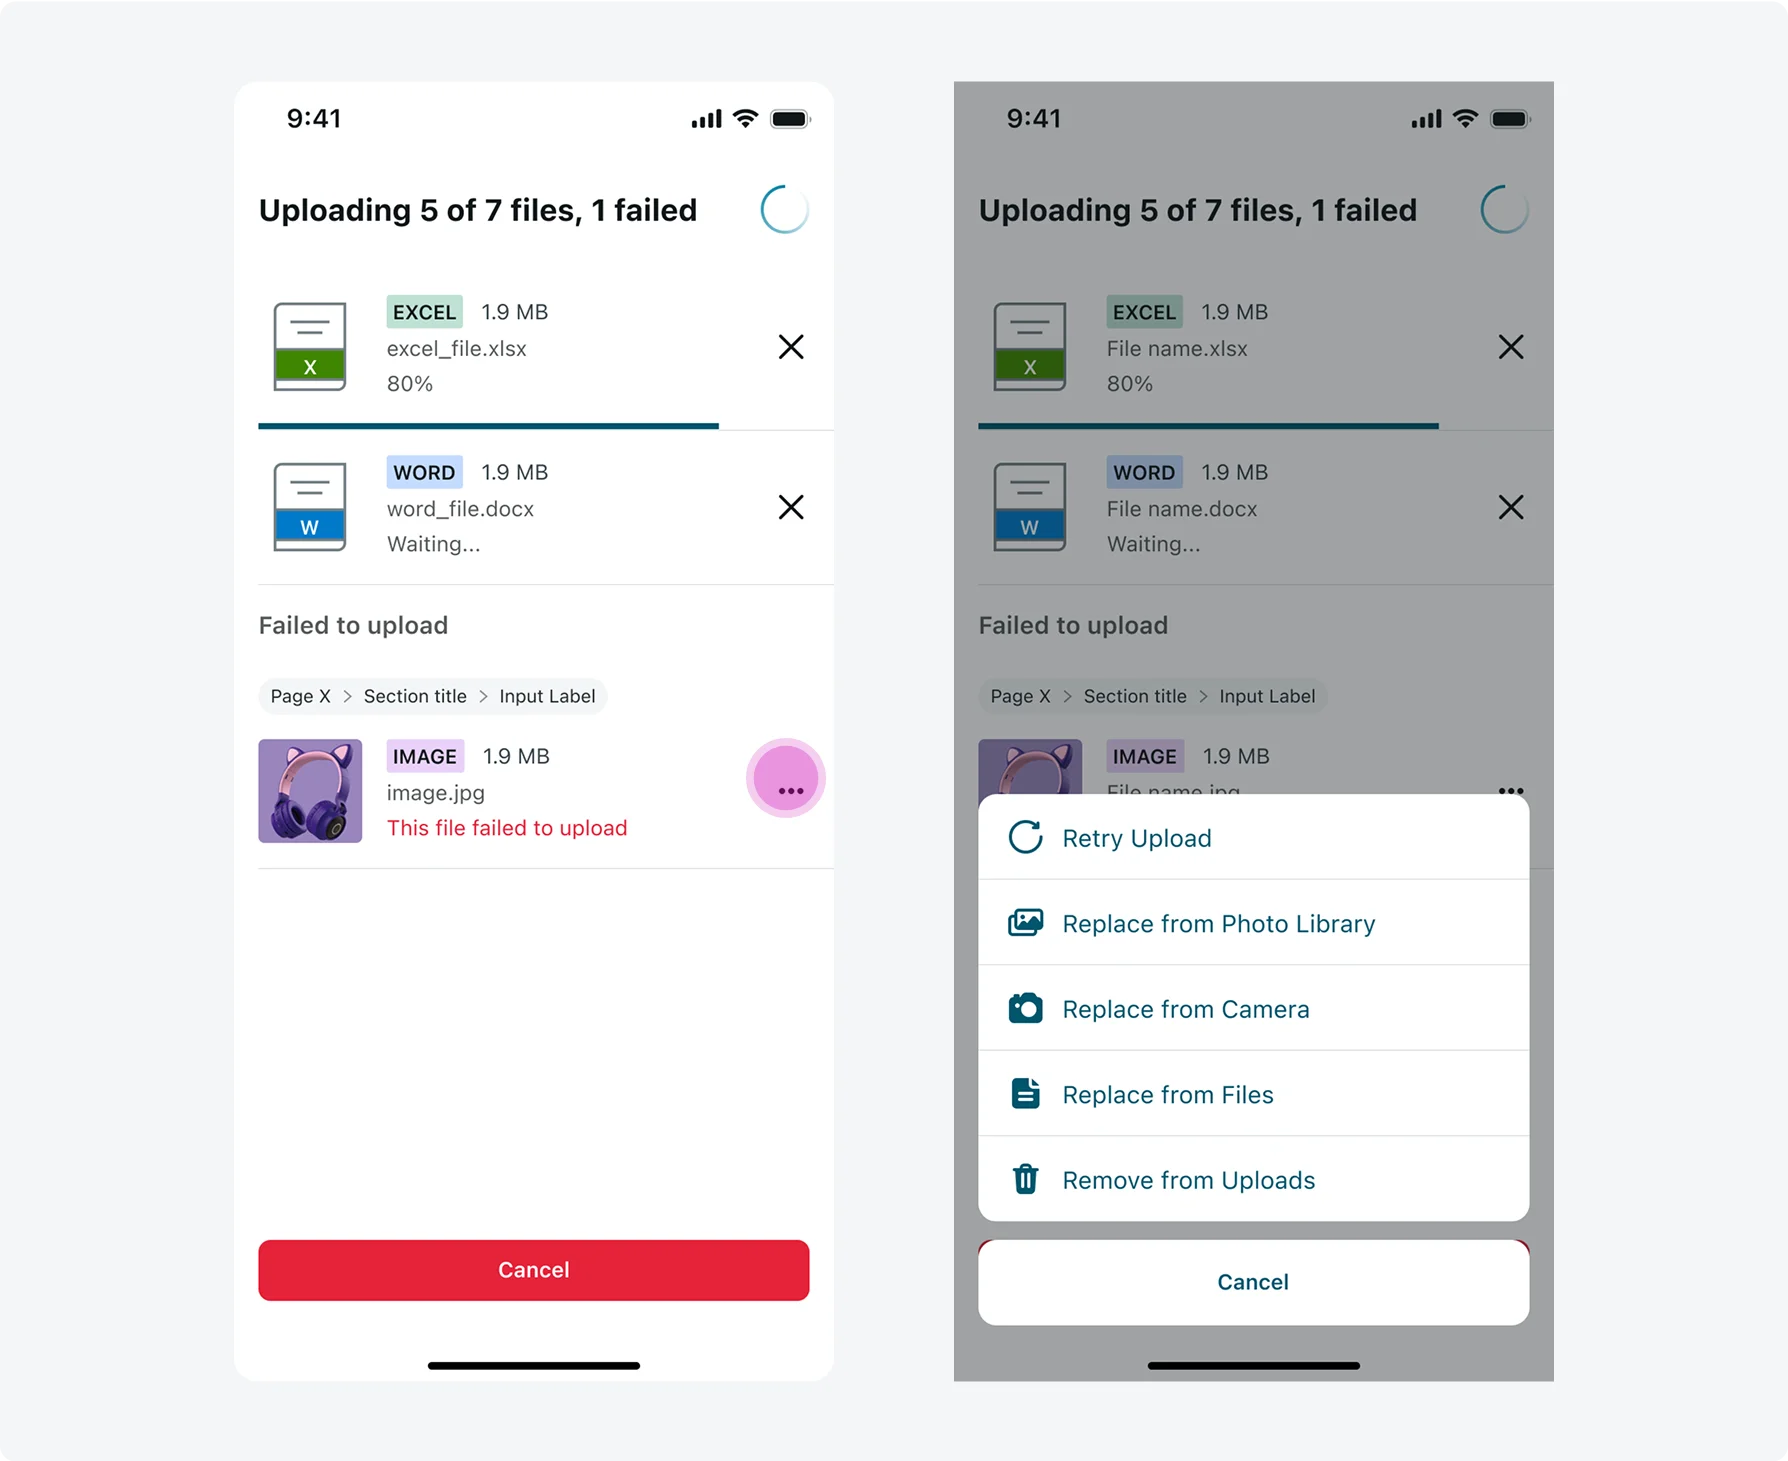
- Upload status bar: Displays a live status summary of total files being processed, including how many are uploading, failed, or pending review. Updates in real time as the queue progresses.
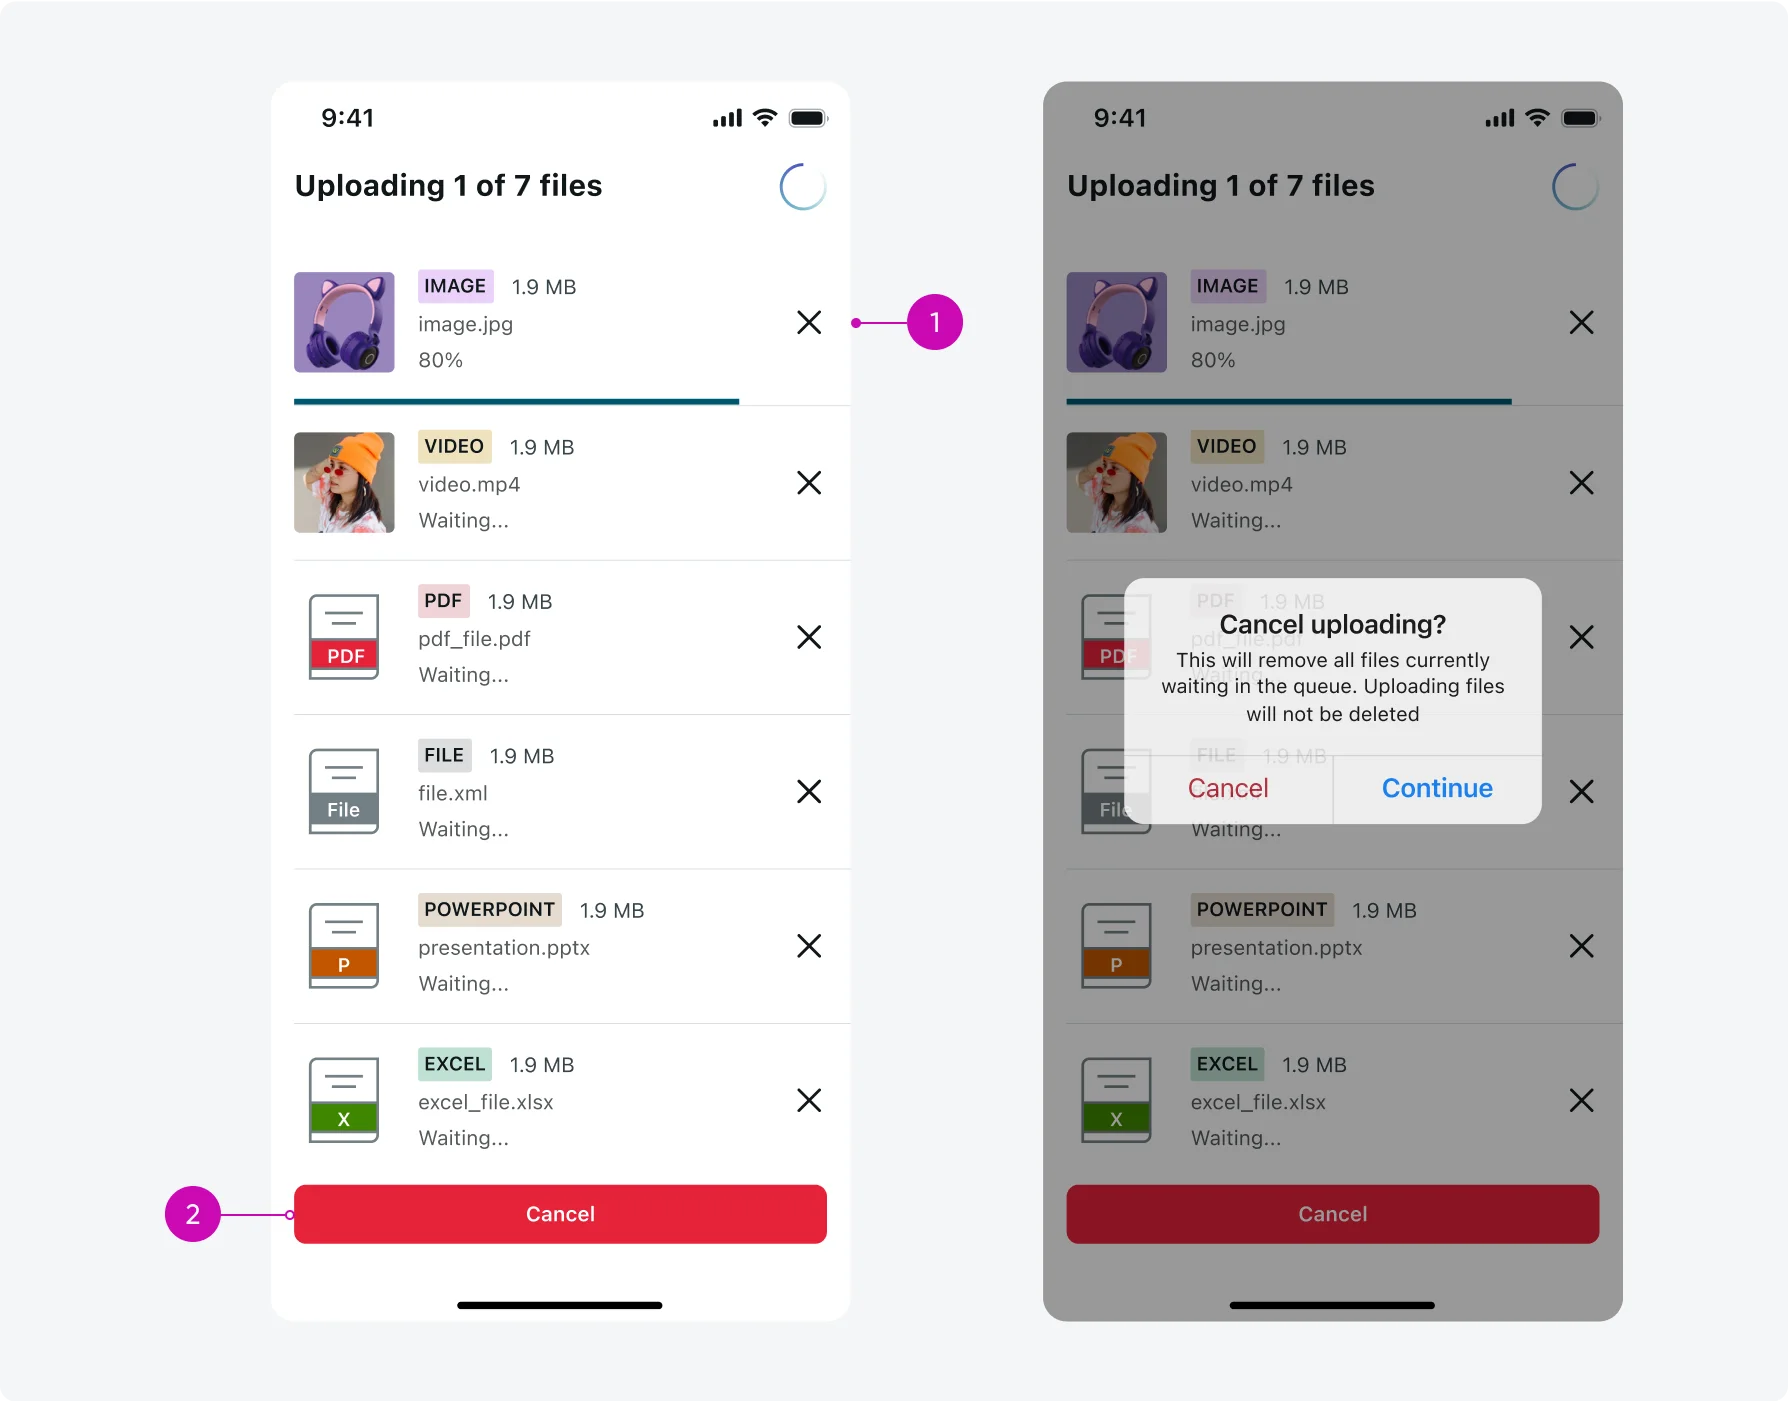
- Uploading files queue: Shows the list of files currently uploading or queued for upload, including file name, type, size, and thumbnail, along with individual progress status, and an “X” button to cancel the upload.
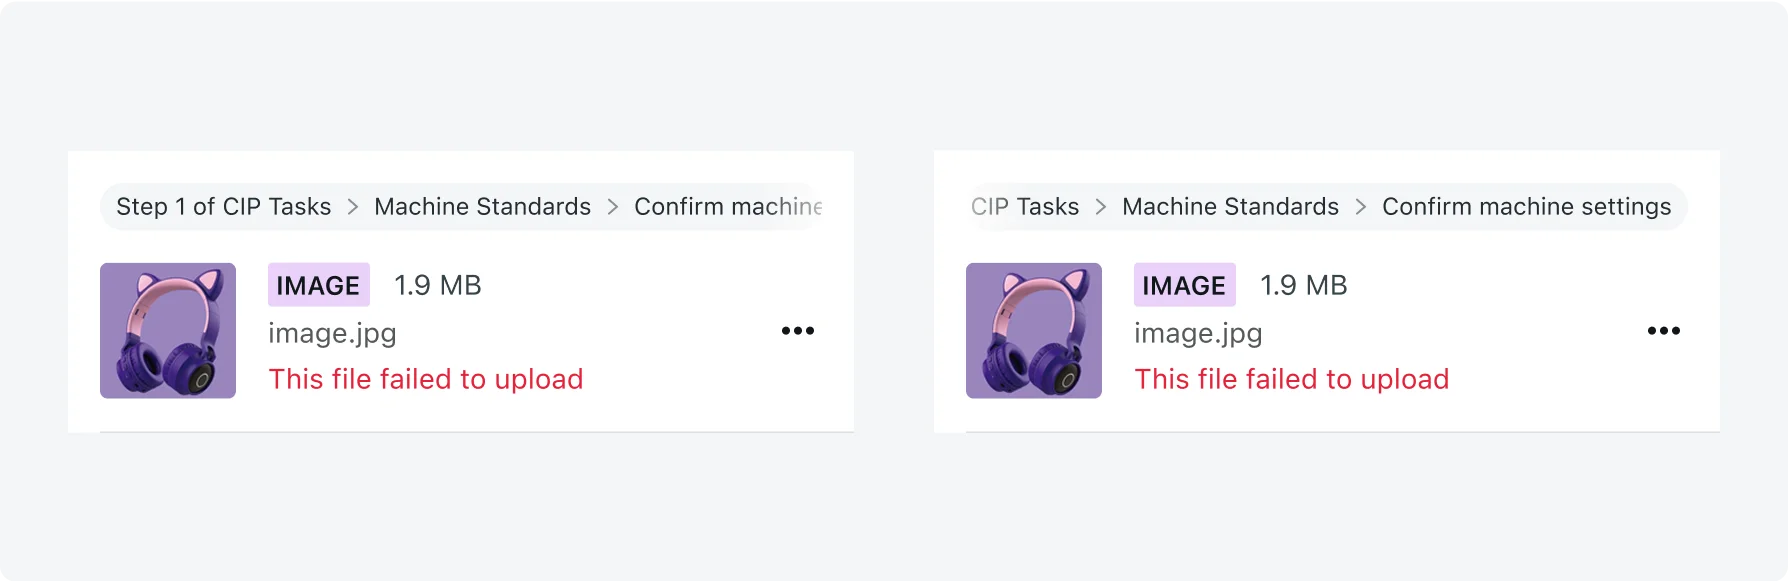
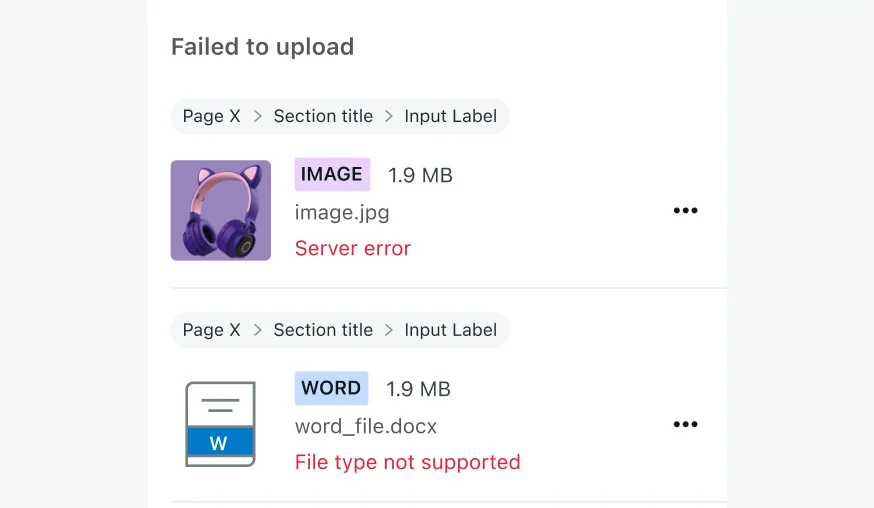
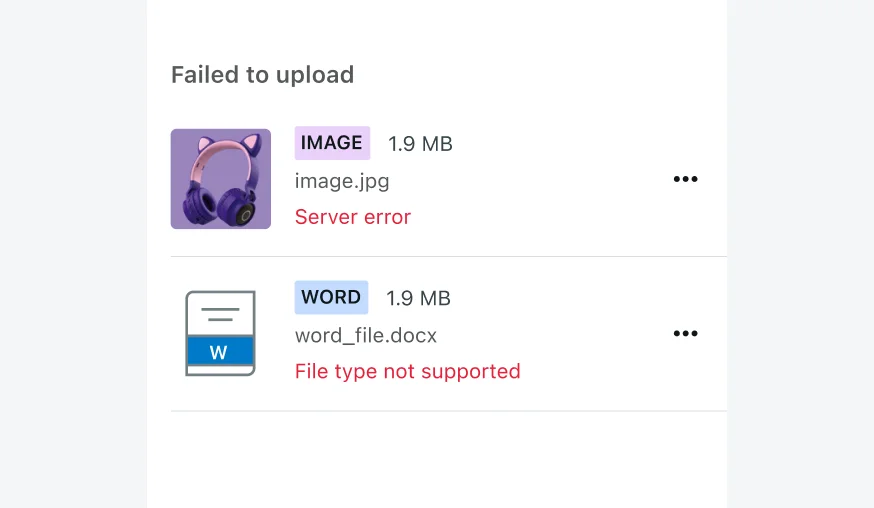
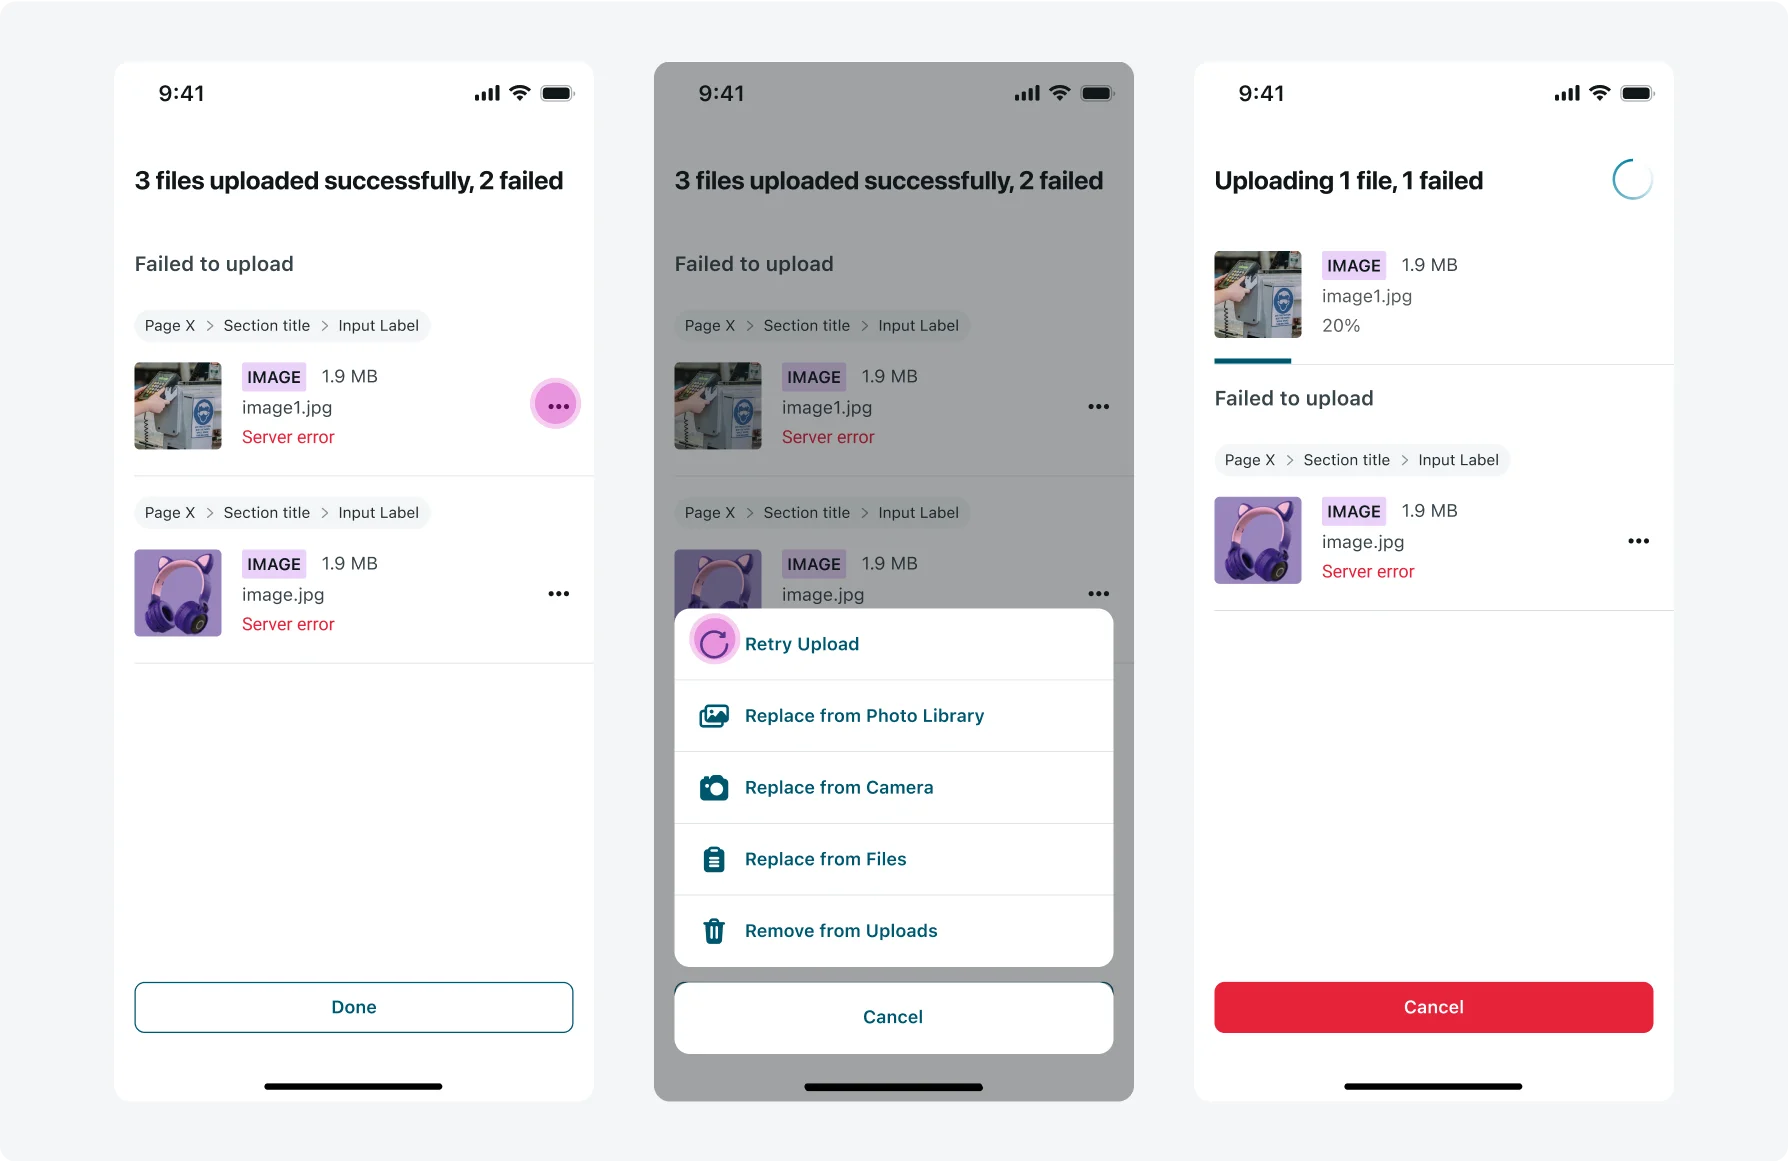
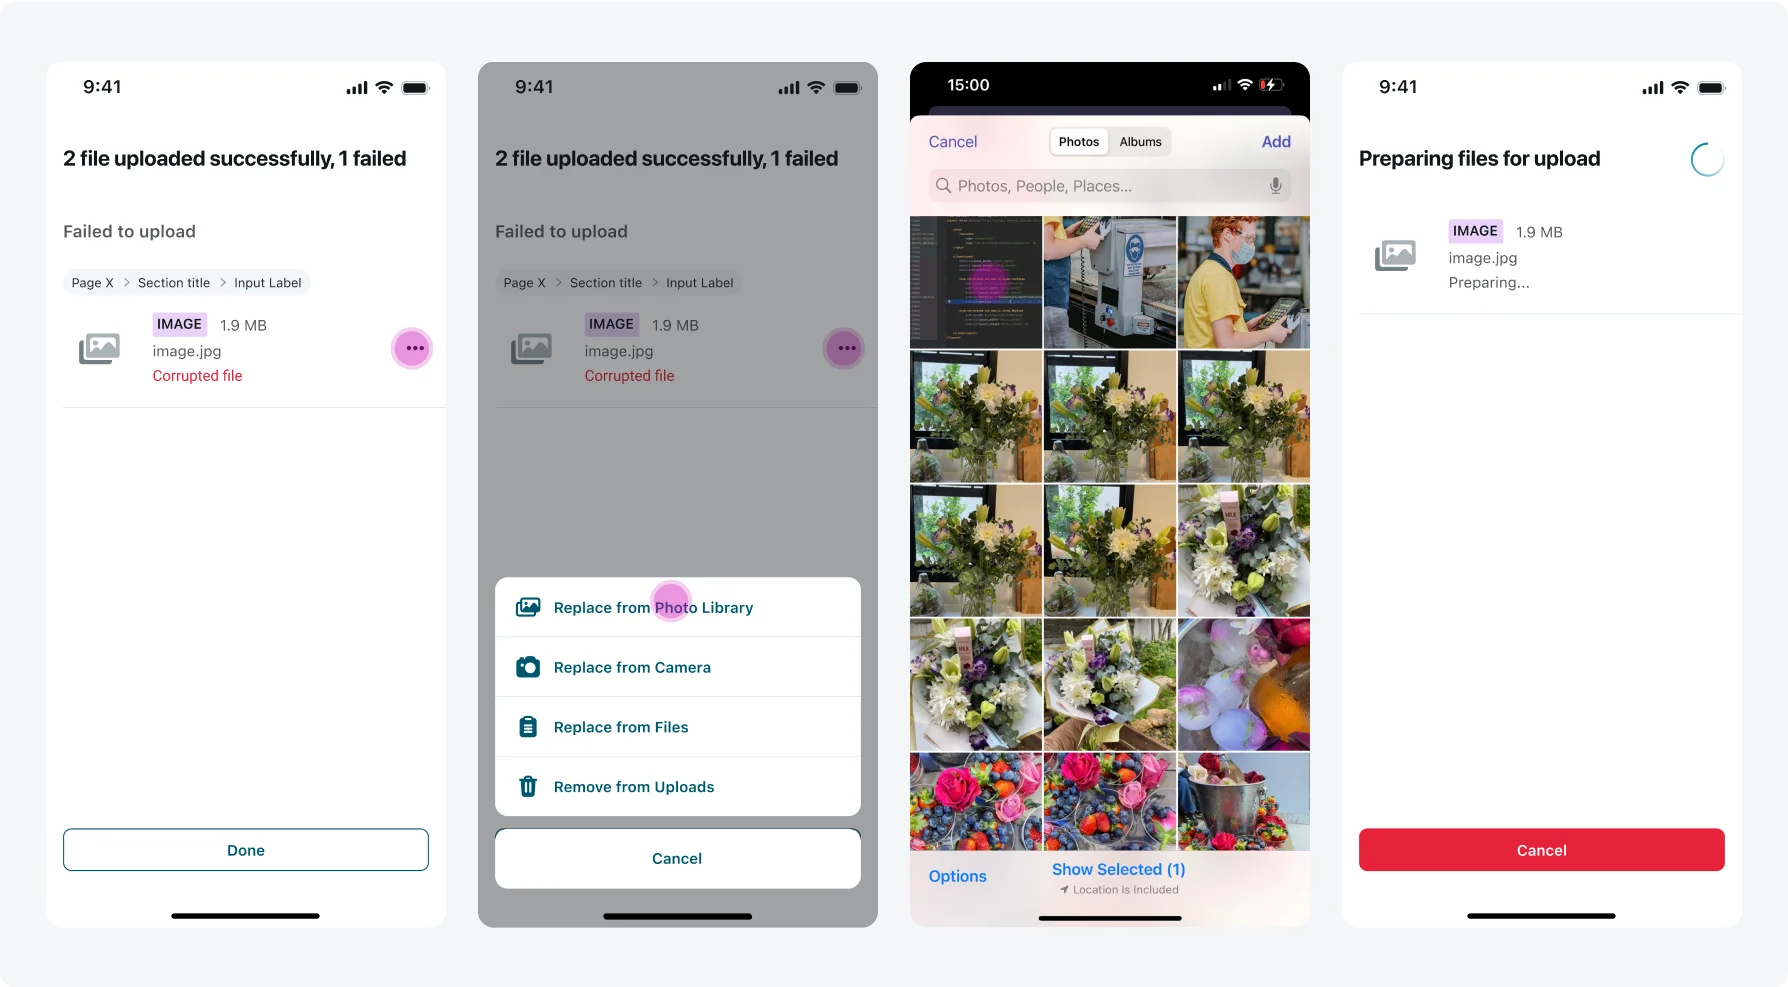
- Failed uploads list: Displays files that failed to upload. This section appears only when at least one upload has failed and groups all failed attachments in a dedicated area. Each failed upload contains it’s file name, type, size, thumbnail, and the error reason highlighted in red, along with an actions menu icon and breadcrumbs (if available).
- Breadcrumbs (only for input form uploads): Indicate where in the input form the failed attachment originated. Shows the page title or number, section title (if available), and input label.
- Actions menu: Opens options for error handling of the failed upload, individual per each failed upload. Includes options such as: Retry, replace, and remove.
- Footer actions (cancel button): Allows users to cancel all active uploads. If uploads are still in progress, tapping this will stop them and close the Upload Manager.
Usage
Use the Attachments Upload Manager to handle file uploads across mobile experiences that support attachments. It is automatically triggered when users add files from supported sources and is designed to give users visibility and control during the upload process.
This component is used in:
- Input Form screens - When attaching files via an input type or input action.
- Record screens - When adding files through the activity stream.
- Mobile Web screens - When uploading attachments through the browser version of the app.
- Any screen using an “Attachment” function - Including custom screens like Map or Calendar that support file uploads.
The Upload Manager is especially useful in mobile workflows where connectivity may be unreliable. It supports upload retry, failed upload file replacement, and cancel actions, helping users complete their tasks without losing data.
Key behaviors
- Automatic launch: Opens automatically when one or more files are added from supported sources.
- Centralized tracking: Displays all ongoing and recently completed uploads in one view.
- Cancel options: Users can cancel individual uploads or all uploads at once.
- Failure handling: Failed uploads remain listed with status. Users can retry, replace, or delete directly from the interface.
- Breadcrumbs for failed uploads: When upload is triggered from an Input Form, each failed attachment shows breadcrumbs - with its original page title/number, section title, and input label - helping users understand where it came from and preserve context.
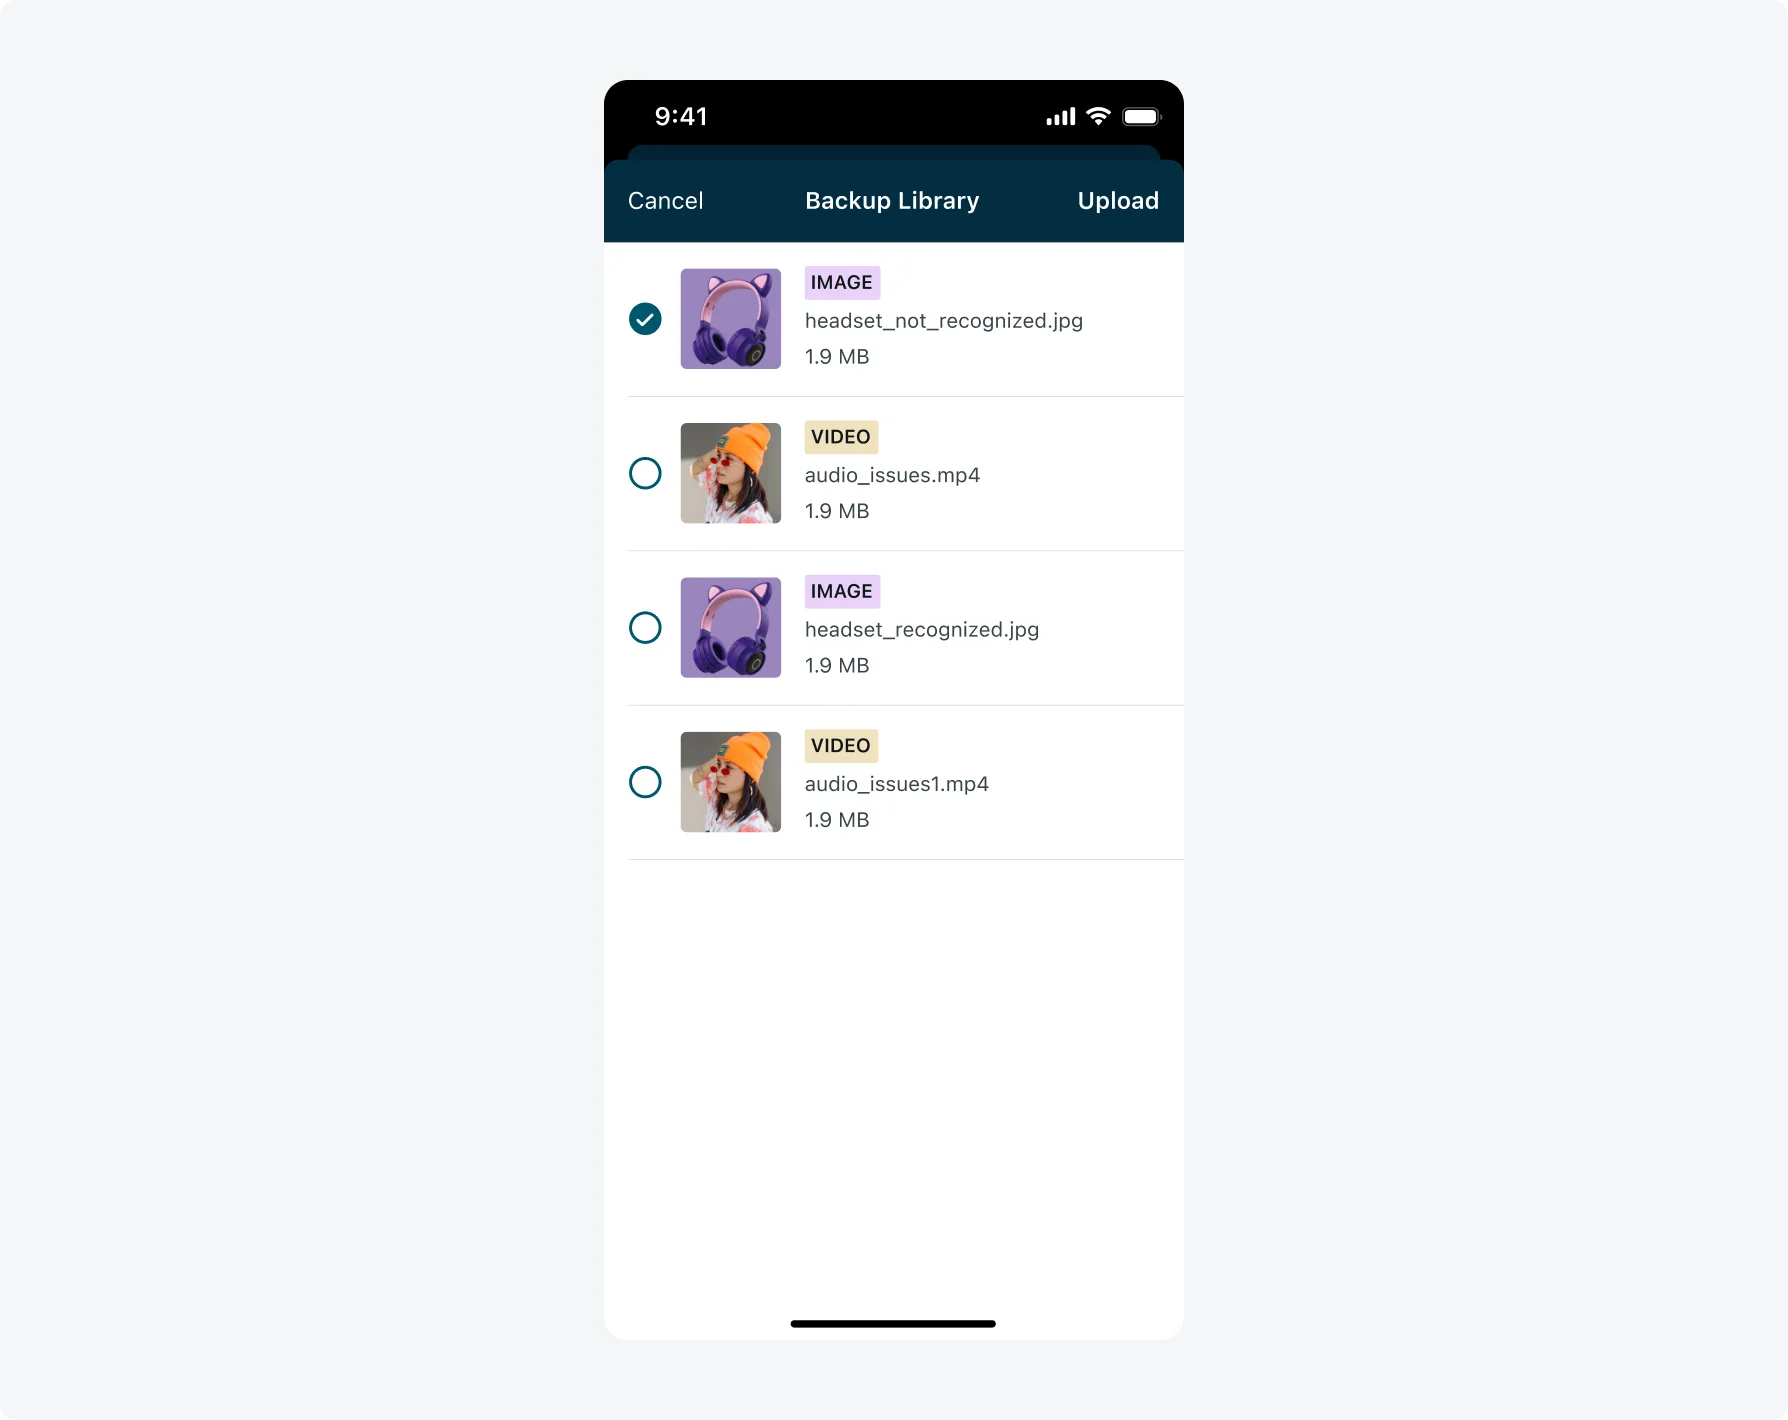
- Attachment replacement with source granularity: Only the originally available attachment sources are presented when replacing a failed file (e.g., if only the Camera was available, users won’t be shown Gallery or File System options).
- Foreground behavior: Uploads block user interaction with the rest of the app until completed, canceled, or dismissed.
- Background behavior: Uploads continue when the app is sent to the background. Status updates are shown upon return.
- Upload enforcement: All attachment uploads are routed through the Upload Manager. It cannot be disabled or bypassed.
Configurations
The Upload Manager is enabled by default and works without any setup. Core features such as real-time tracking, cancel actions, breadcrumbs and failure handling (retry, replace, delete) require no configuration.
However, the backup library for camera attachments is an optional capability that must be explicitly enabled by the admin. When configured, it adds a layer of protection for camera-sourced files in case uploads fail.
Read more about Backup library for camera attachments
Backup library for camera attachments
Only use the breadcrumbs component in your designs for failed uploads that originated from the Input Form screen. Toggle it on/off using the properties panel.
Don’t use breadcrumbs for failed file uploads that were not added from the Input Form screen.
2. Breadcrumbs with long text

If the breadcrumb text exceeds the component’s width, a fade effect is applied on the right side to indicate that additional content is available via horizontal scrolling. In your design, if you wish to incorporate long text in the breadcrumbs, switch the component’s “State” variant to “Long Text – Scroll Start”. To show the end of the scroll, use the “Long Text – Scroll End” variant.

Don’t use the default breadcrumbs component variant to display long text that extends beyond the component’s width.
Responsive behaviors
The Upload Manager stretches edge-to-edge and adjusts automatically to fit the width of the device. It supports both portrait and landscape orientations without affecting functionality or layout.
Landscape mode
This is what the Upload manager looks on Landscape mode:
Internationalization
The Upload Manager fully supports right-to-left (RTL) languages. When a device is set to an RTL language, all UI elements - including file names, upload statuses, and action icons - mirror their layout to align with RTL reading direction. This ensures a consistent and accessible experience for global users across all supported languages.

Interactions
The Upload Manager provides a centralized experience for managing file uploads. It is automatically triggered and guides users through the full upload process with clear feedback and recovery options.
1. Upload Initiation
- Trigger: User adds one or more files from a supported source (Camera, Gallery, or File System).
- Behavior: The Upload Manager opens automatically and displays each file with an upload progress indicator.

2. Cancel Uploads
1. Cancel individual upload: Tapping the Cancel icon next to a file stops and removes it from the queue immediately. 2. Cancel all uploads: Tapping the “Cancel” footer button stops all ongoing uploads and clears the list. An alert will be displayed to confirm the action.
3. Successful Upload
Successfully uploaded files display a success status and immediately disappear from the list. Once all uploads complete, the Upload Manager closes automatically or can be dismissed manually.

4. Failed Uploads Error Handling
If a file fails to upload, the following actions are available from the 3 dot actions menu icon:
- Retry: Re-attempt the upload.
- Replace: Replace the failed file using the original attachment source options (e.g., Camera, Gallery).
- Delete: Remove the failed file from the list. A confirmation dialog will appear.
- **Close without action: **The Upload Manager can be closed without resolving failed uploads. If the file came from the Camera and the backup library is enabled, the file is stored locally for later retry.
5. Retry upload
Users can retry uploading attachments that failed due to temporary issues such as poor network connectivity or server errors.
- As long as the upload manager is opened, retry can be initiated at any time, even while other uploads are still in progress.
- Retried files are placed at the end of the upload queue and processed once their turn arrives.
- If the retry fails, the attachment returns to the failed state, users may repeat the retry action multiple times or choose to remove the file.
6. Replace Attachment
Users can replace a failed upload by selecting a new file from supported sources.
- The available sources (Camera, Gallery, Files) are determined by admin configuration and match those originally provided.
- As long as the upload manager is opened, file replacement can be initiated at any time, even while other uploads are still in progress.
- The new replaced file is added to the end of the queue and uploaded in turn.
- Only one replacement file can be selected at a time.
- If the replacement fails, the attachment returns to the failed state, users may repeat the replace action multiple times or choose to remove the file.
7. Remove failed attachment from uploads
Users can remove failed attachments at any time, regardless of the reason for failure.
- When a failed file is deleted, it is removed from the Upload Manager.
- If all remaining attachments are removed and no uploads are in progress, the Upload Manager closes automatically.
8. Breadcrumbs
When the Upload Manager is triggered from an Input Form screen, each failed upload displays breadcrumbs to indicate its original upload location in the form and preserve context. This helps users understand where the failed file was added and makes it easier to decide how to handle it. Breadcrumbs include:
- Page title or number
- Section title (if available)
- Input label (for attachment inputs) or parent input label (for attachments inside input actions)
Interactions: Breadcrumbs support horizontal scrolling when the text exceeds the component’s width, allowing users to view the full path. Outside of this scroll interaction, breadcrumbs are read-only and not tappable - they do not support direct navigation back to the form.