
Conceptual and configuration guidance

Figma library with components for designing Native Mobile.
Overview
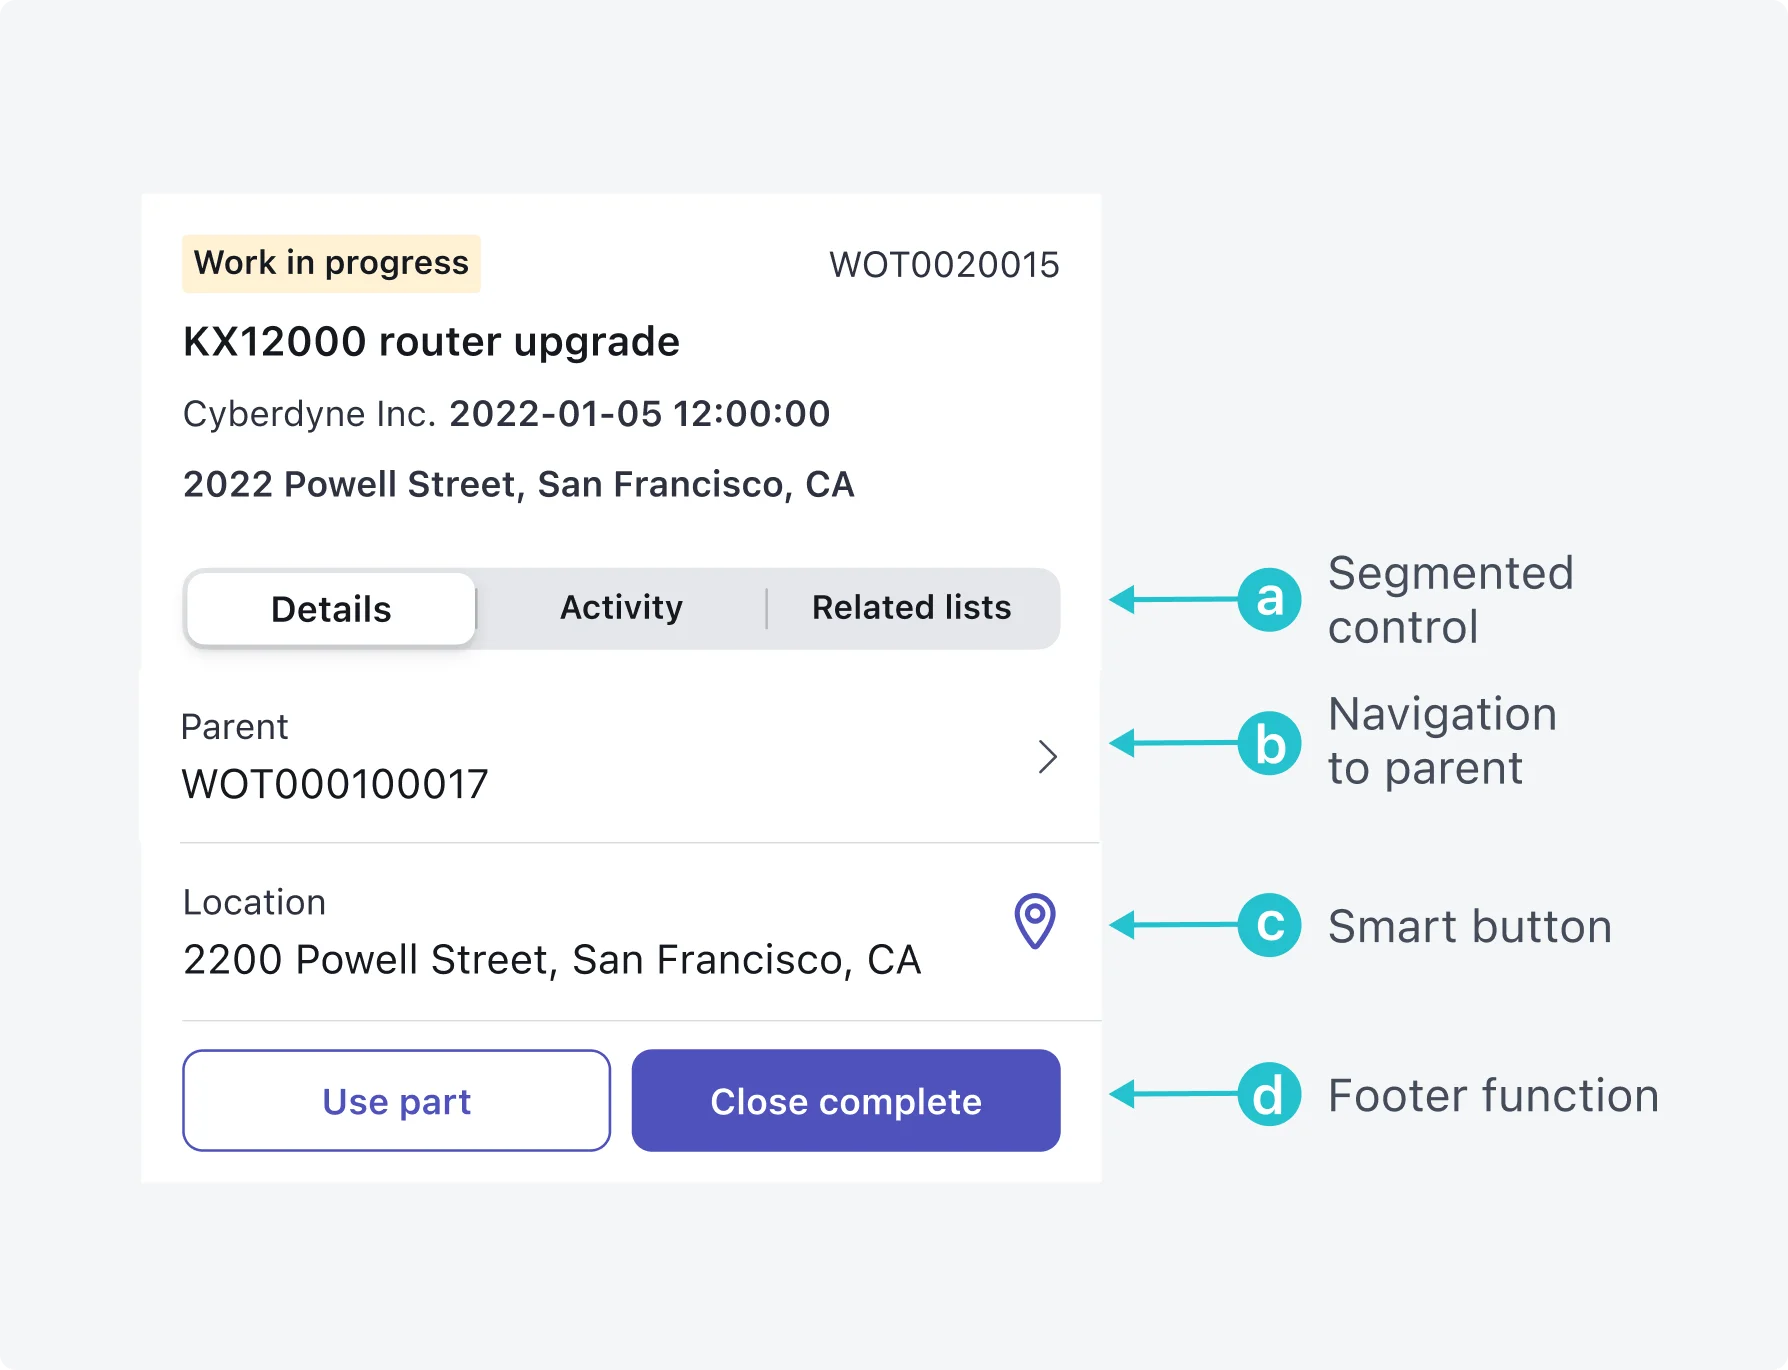
Use record screens to display the content of a single record. You can configure functions on record screens to allow users to make edits and take actions. Record screen supports top menu functions, footer functions, and smart buttons.
You can configure access to record screens directly from a launcher screen icon or navigation bar tab, or as a secondary screen in a list, map, or calendar. Use a record screen as a secondary screen to provide record detail on a specific item, for example, an incident record on a list of incidents.
- Screen space is limited on mobile devices. Try to limit the information displayed on a record screen to what your users need while working remotely. Also consider placing the most used information towards the top of the screen, to help your users find what they need without having to scroll down.
- Record screens can contain multiple screen segments. Screen segments act as a tabbed interface to display different types of information in your record screen help to filter and organize information. A record screen may contain any number of screen segments.
- The Android version of the apps display up to three screen segment titles on a record screen at once. Additional screens can be access by scrolling horizontally.
- The iOS version of the apps can display up to five screen segment titles on a record screen at once. If there are more than five screen segments, a “More” screen segment displays to display the remaining screen segments. Limit the number of screen segments to improve usability. Wider screen segments are easier to tap.
- In both operating systems, try to limit your forms to 2-3 screen segments to avoid negative performance impact and provide a cleaner user experience.
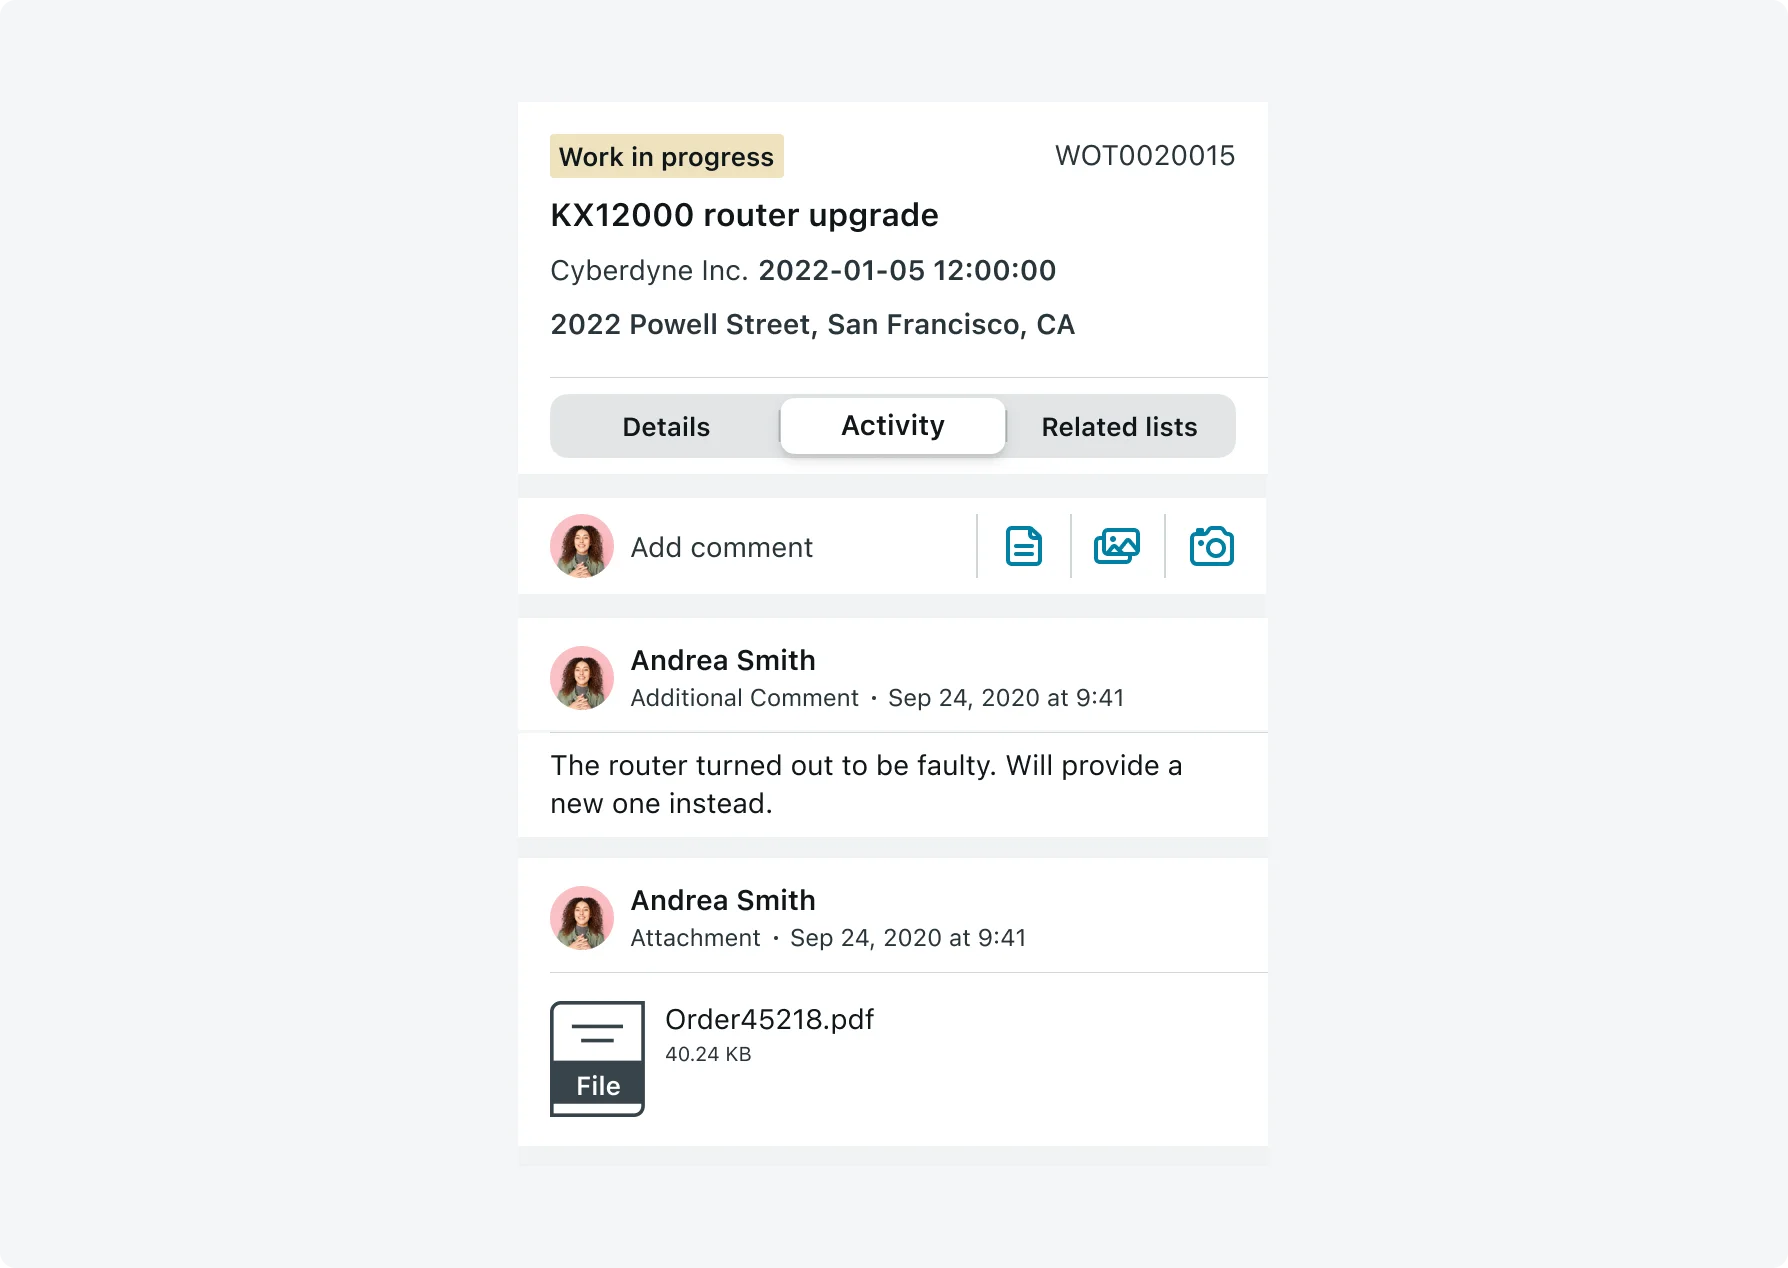
Record screens can include screen segments from the following types: activity stream, related lists, embedded List, details screens, mobile web screen or section screen.
- A form header can display a card.
- The header card can act as a navigation button. Use this feature to navigate back to a parent record. When configuring your header for this purpose, be sure to include the parent record ID and indication that navigation is available.
- Record screens can be created independently from lists and other screen types. For example:
- In a home launcher screen, you can configure the employee image to navigate to a form record displaying the user profile.
- Configure an entry in an icon section to navigate to a record section.
- Configure an option in an employee profile navigate to the employee’s manager profile.
- A record screen can be standalone or be navigated from a list, map, calendar screen. In case the record screen is not standalone, the card which appears in the record screen header can match the card in the previous screen or include different fields.
Consider hiding the record screen name to make a screen generic, and reusable in different contexts. For example a screen displaying a user record has a screen name of “Employees”. If you remove the name, this record screen could be used in other areas of your app to display user records that are not necessarily employees.

Screen field types
Use screen fields to improve the usability of your record details screen. Keep your record screen focused. Do not overload your screen with more information than your users need to perform their tasks. If many screen fields are necessary, consider dividing the content into different screen segments.
Use Screen UI Policies when showing fields on the details screen, give your users the information they need when they need it. For example, show Reject reason only if the state is Rejected.
1. Checklist
Checklists are a platform component that will also render in the app. Checklists can be used for to do’s and tasks.

2. Attachment
- The attachment screen field presents attachments added to the record. The field also provides controls to delete and rename attachments. This is useful for cases where there are a small number of attachments.
- You can combine an Attachment screen field with a footer function of upload attachment. For example, Task of “Upload your profile photo.” on the details screen add an upload attachment button and allow the user to see the uploaded image with the Attachment screen field.

3. Video
- Use a video field to embed a video within the record.
- Video content cannot be hosted on your instance. Use externally hosted videos on YouTube or Vimeo


5. HTML
- The HTML field replicates the HTML field type in platform. Use an HTML field to display formatted text, including bold, italicized, or resized text.
- Use an HTML field when need to add information to a screen based on an HTML field within your instance. The component works best with limited information as the height of the HTML field is limited. Style your HTML content to match the style of the app to have a coherent design.
- HTML fields are not intended to display an embedded website. Doing so can result in unpredictable behavior. Consider using a mobile web screen to direct your users to the original site in these cases.
- HTML fields are based on WebView components, which have limitations on the supported behaviors. For example, Javascript is not supported, and web page errors are ignored. Test your HTML fields to ensure that any required behaviors are supported. If you have requirements that are not supported in an HTML field, consider a mobile web screen to direct users to a site containing that content.
Footer functions can have dependencies to be enabled based on a user’s interaction. This includes tapping videos, images, mobile web screen navigation checklists and attachments. Creating this dependency will make the footer function once the screen field is interacted with. Examples include, tapping on a URL or watching a video where a footer function then becomes enabled. As well as checking items off a checklist and then visualizing a footer function to close the task.

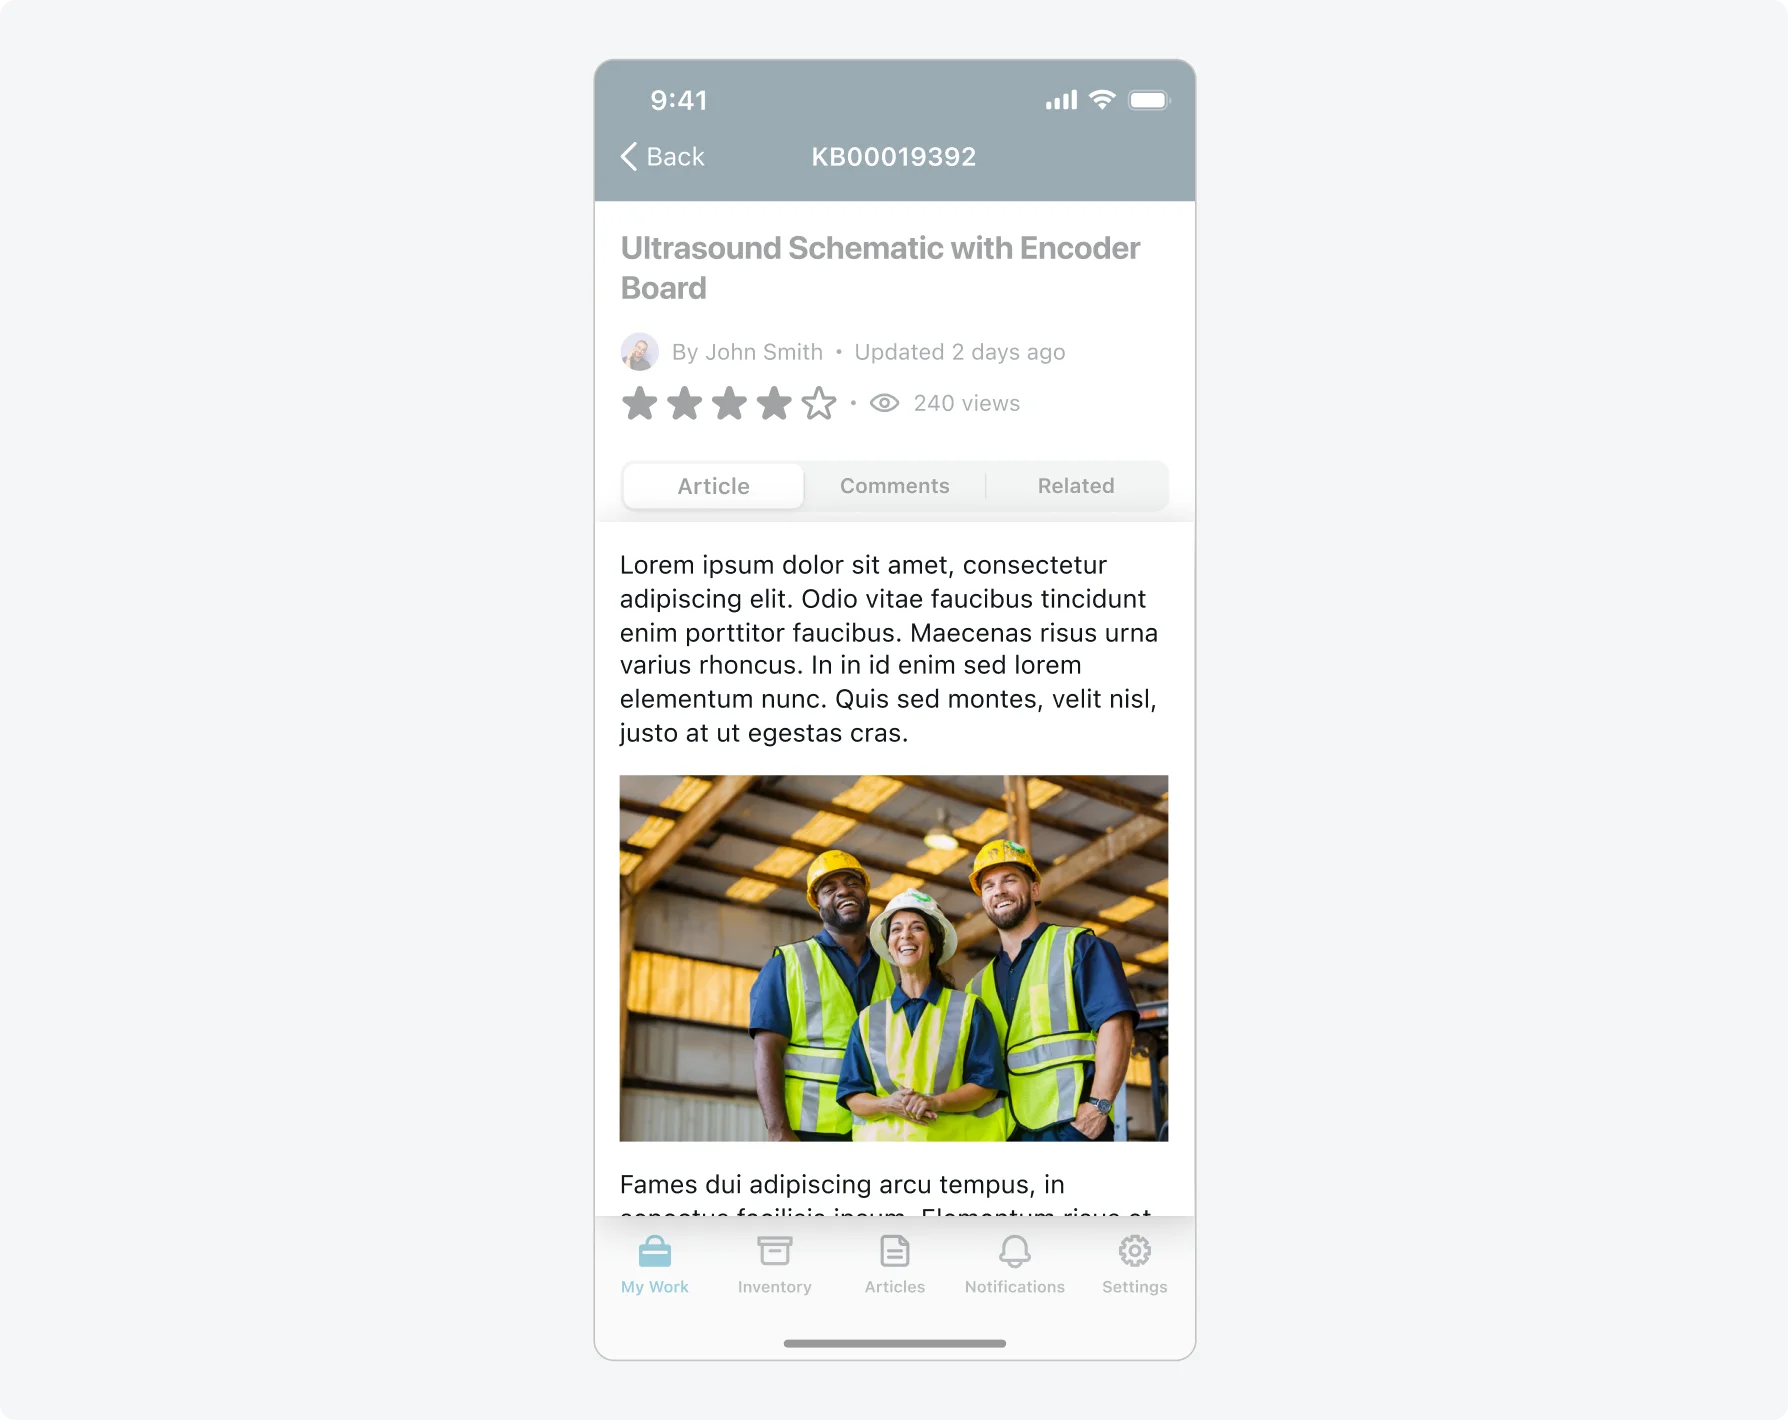
6. Rating types
Users can rate articles using two rating types: select and spannable.
- Select ratings: this allows users to select one rating, such as a thumbs up or thumbs down.
- Spannable ratings: this allows users to select a spanned rating, such as 4 out of 5 stars.
Rating icons are configurable. Use different icons for unhighlighted and highlighted (unselected and selected) ratings. When configuring your own rating icons, be sure they are easy to understand and follow accessibility color and size standards.
You can not configure more than one select or spannable rating on a screen. For example, you have two spannable ratings on one screen.

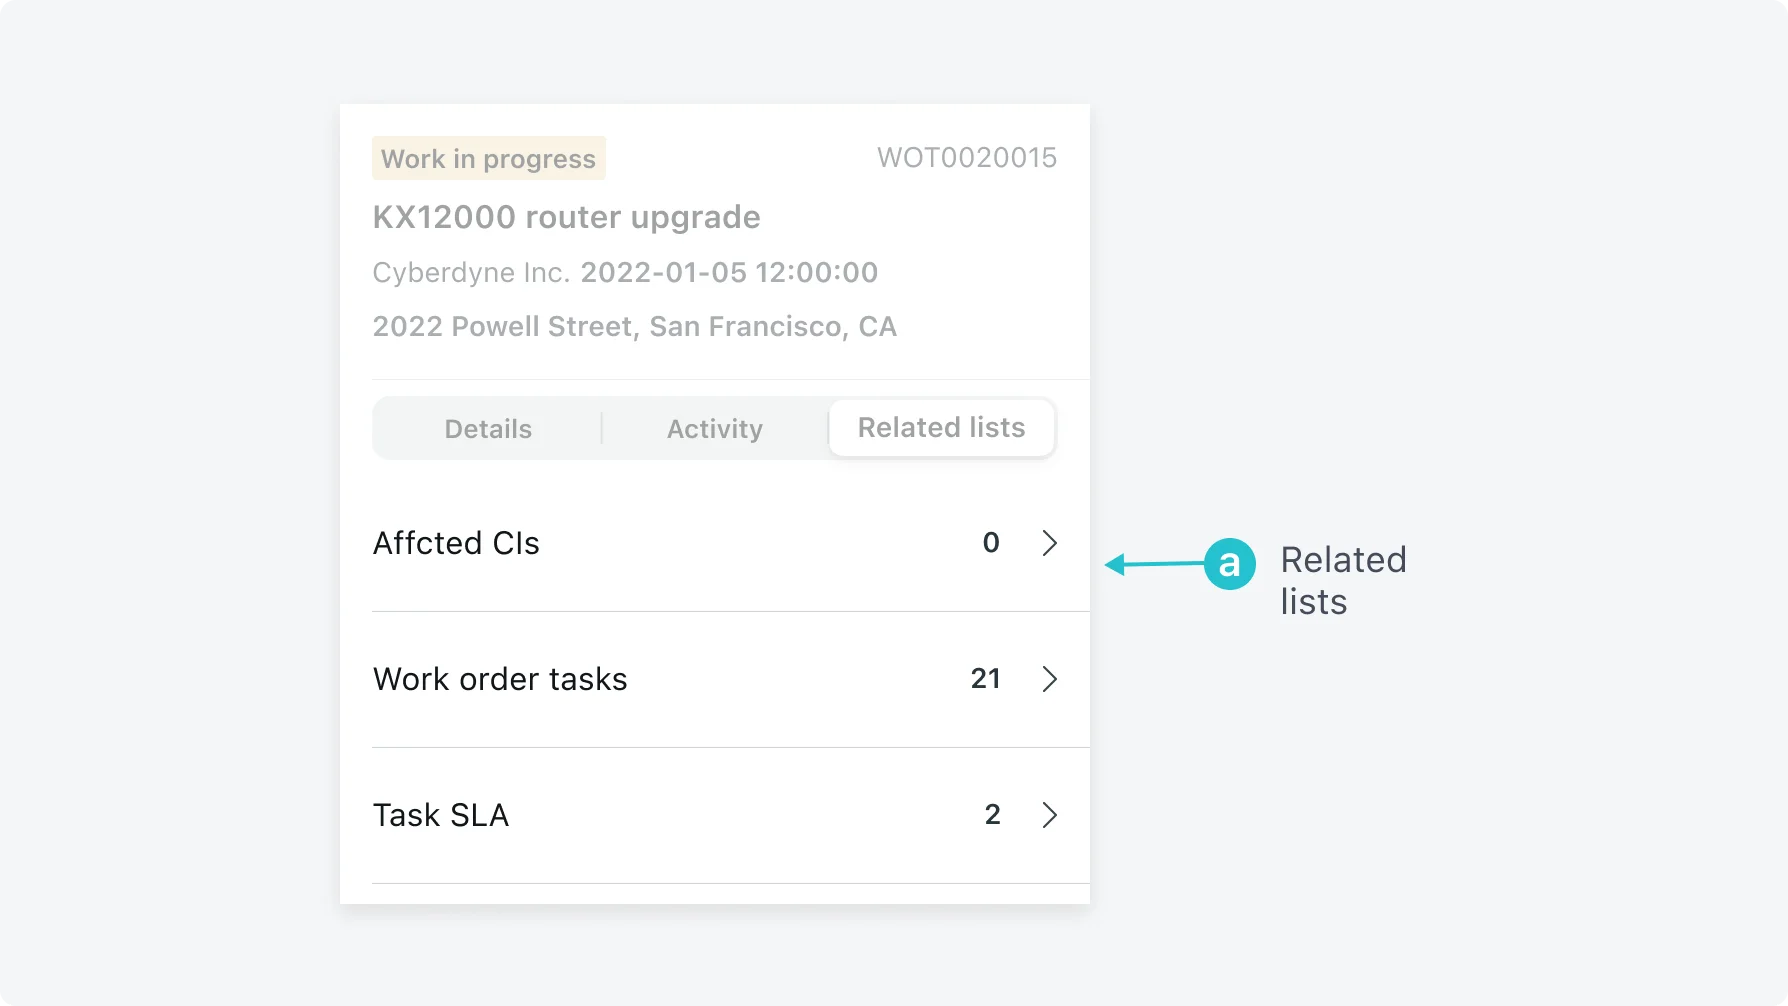
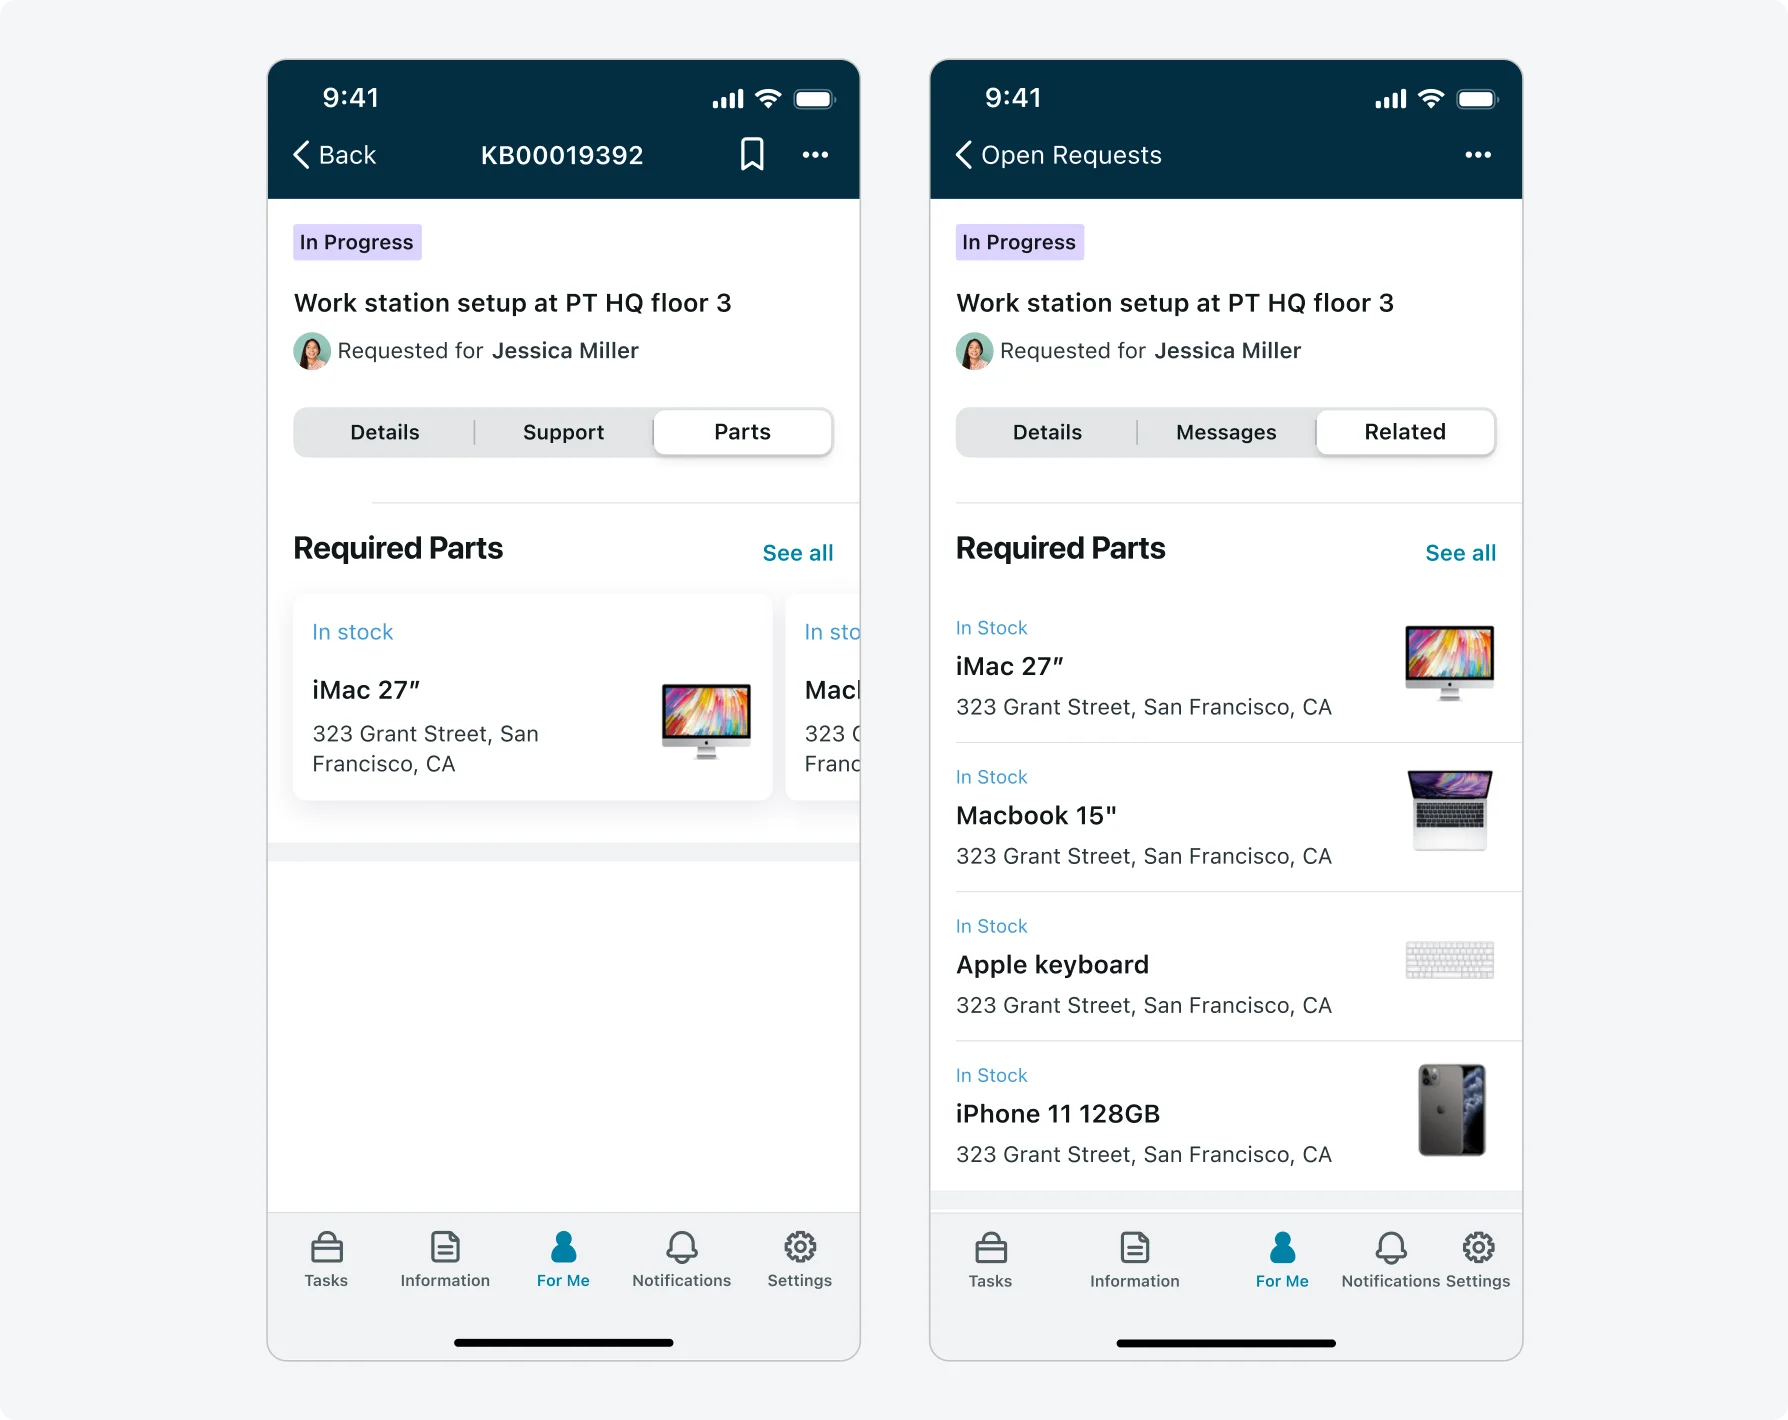
Related lists
Use related lists to display related information to the record. This is great to use when you have more than 1 related list the user will need to see. The user will see the list of related lists and the count of records in each list.
If there is only one related list to show, you may want to consider using an embedded list. This will directly display the list view as a screen segment on the form and will save the user a tap.
You can restrict access to the Related List segment within the Record screen for specific users by assigning User Roles. Click here to learn more.
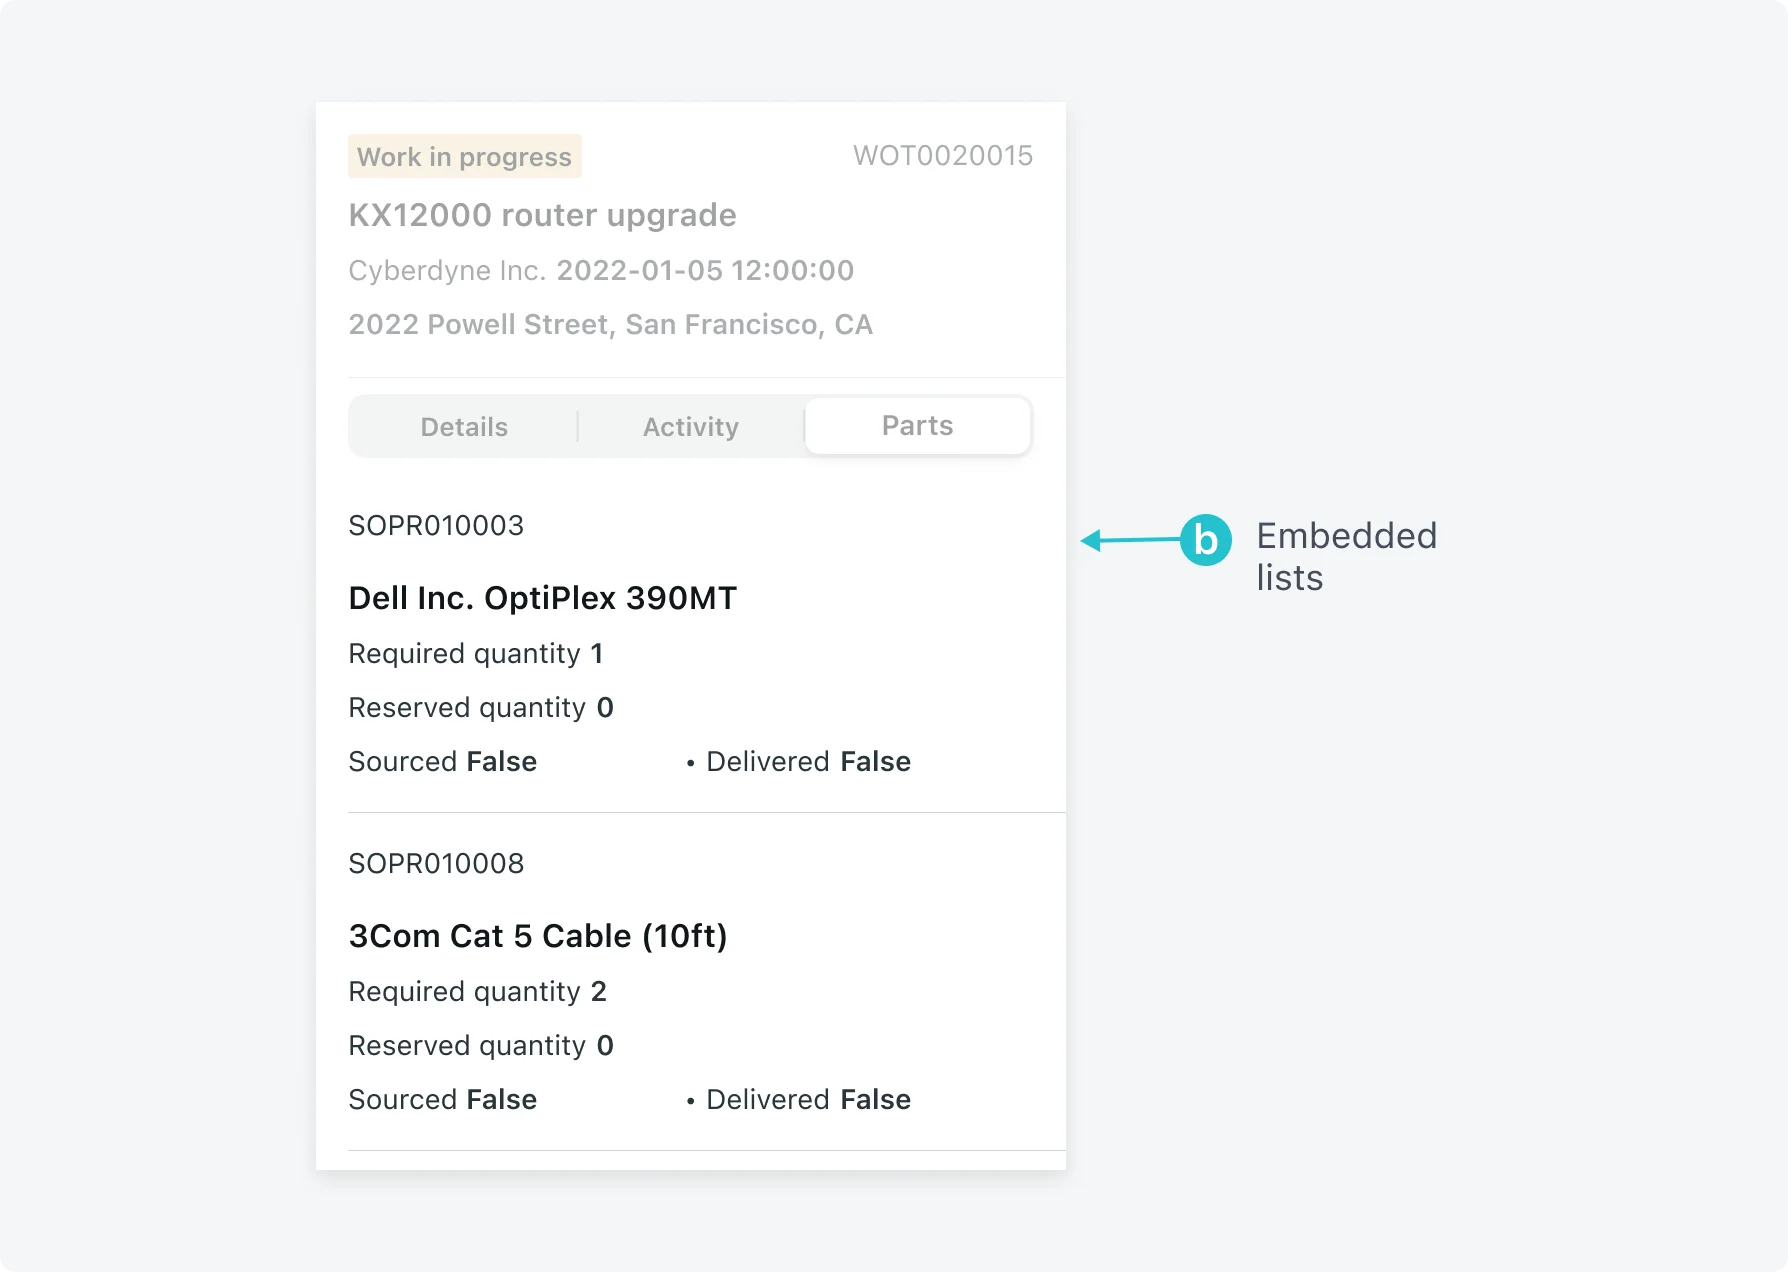
Embedded lists
Use embedded lists to display lists of related information in an easily accessible record screen segment rather than having your users navigate away to a related list. For example, you could add a list of part records to your work order form. For example, you could display a list of timecards related to your timesheet form.
Embedded mobile web screen
Use an embedded mobile web screen to display web pages within a record screen segment. When using an embedded mobile web screen, consider the following:
- Ensure the design and color of the web pages are consistent with those of the record screen, to give your users a similar experience.
- Whenever possible, use native instead of web pages. Web pages are not necessarily designed for use on mobile devices and may not provide the best experience for your mobile users.
- Do not configure an embedded mobile web screen to be accessible offline, as users will not be able to view the content.
Sections screen
Use sections screen to display lists as sections within a record screen segment. For example, present record-related lists in a section screen to enable a quick preview of related lists, without the need to navigate to each list separately. When using a sections screen, consider the following:
- Use the correct fetch type to enable efficient loading time. For screen segments, other than the first screen segment, wherever possible use the “On demand” fetch type.
- All capabilities for record section are supported in the sections screen. Use horizontal and vertical layouts, card capabilities to enhance the user experience and interaction with the cards.
- The list can be related to the record in the record screen. For example, child incidents can be related to parent incidents or can be stand-alone. Consider the use case and set the record section accordingly.
- A sections screen can contain up to 8 record sections. Place the most usable ones at the top of the screen. Ideally, there shouldn’t be more than 5 record sections defined in the screen, to prevent performance issues.
You can restrict access to the Section Screen segment within the Record screen for specific users by assigning User Roles. Click here to learn more.
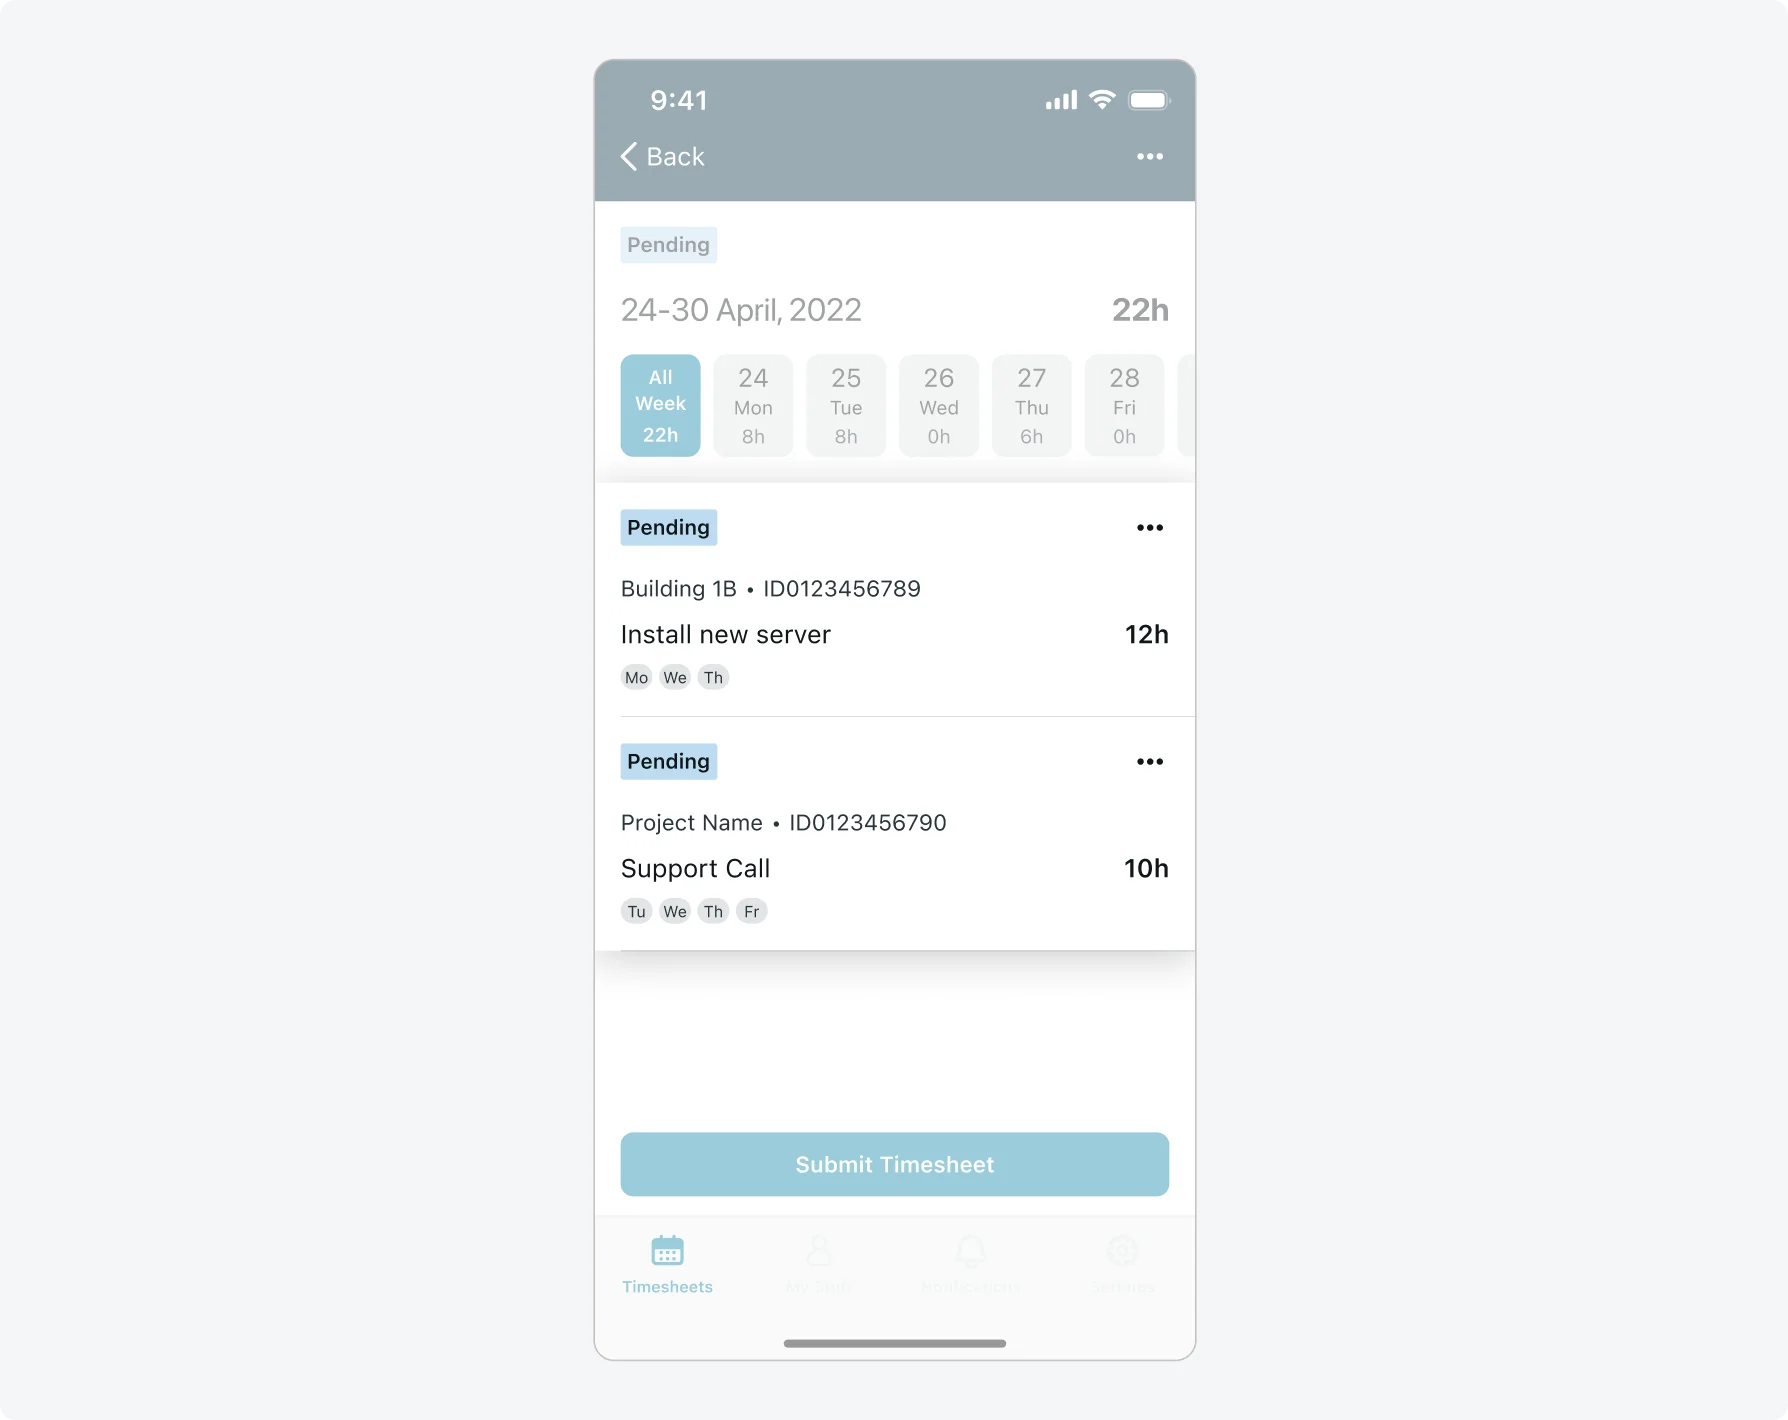
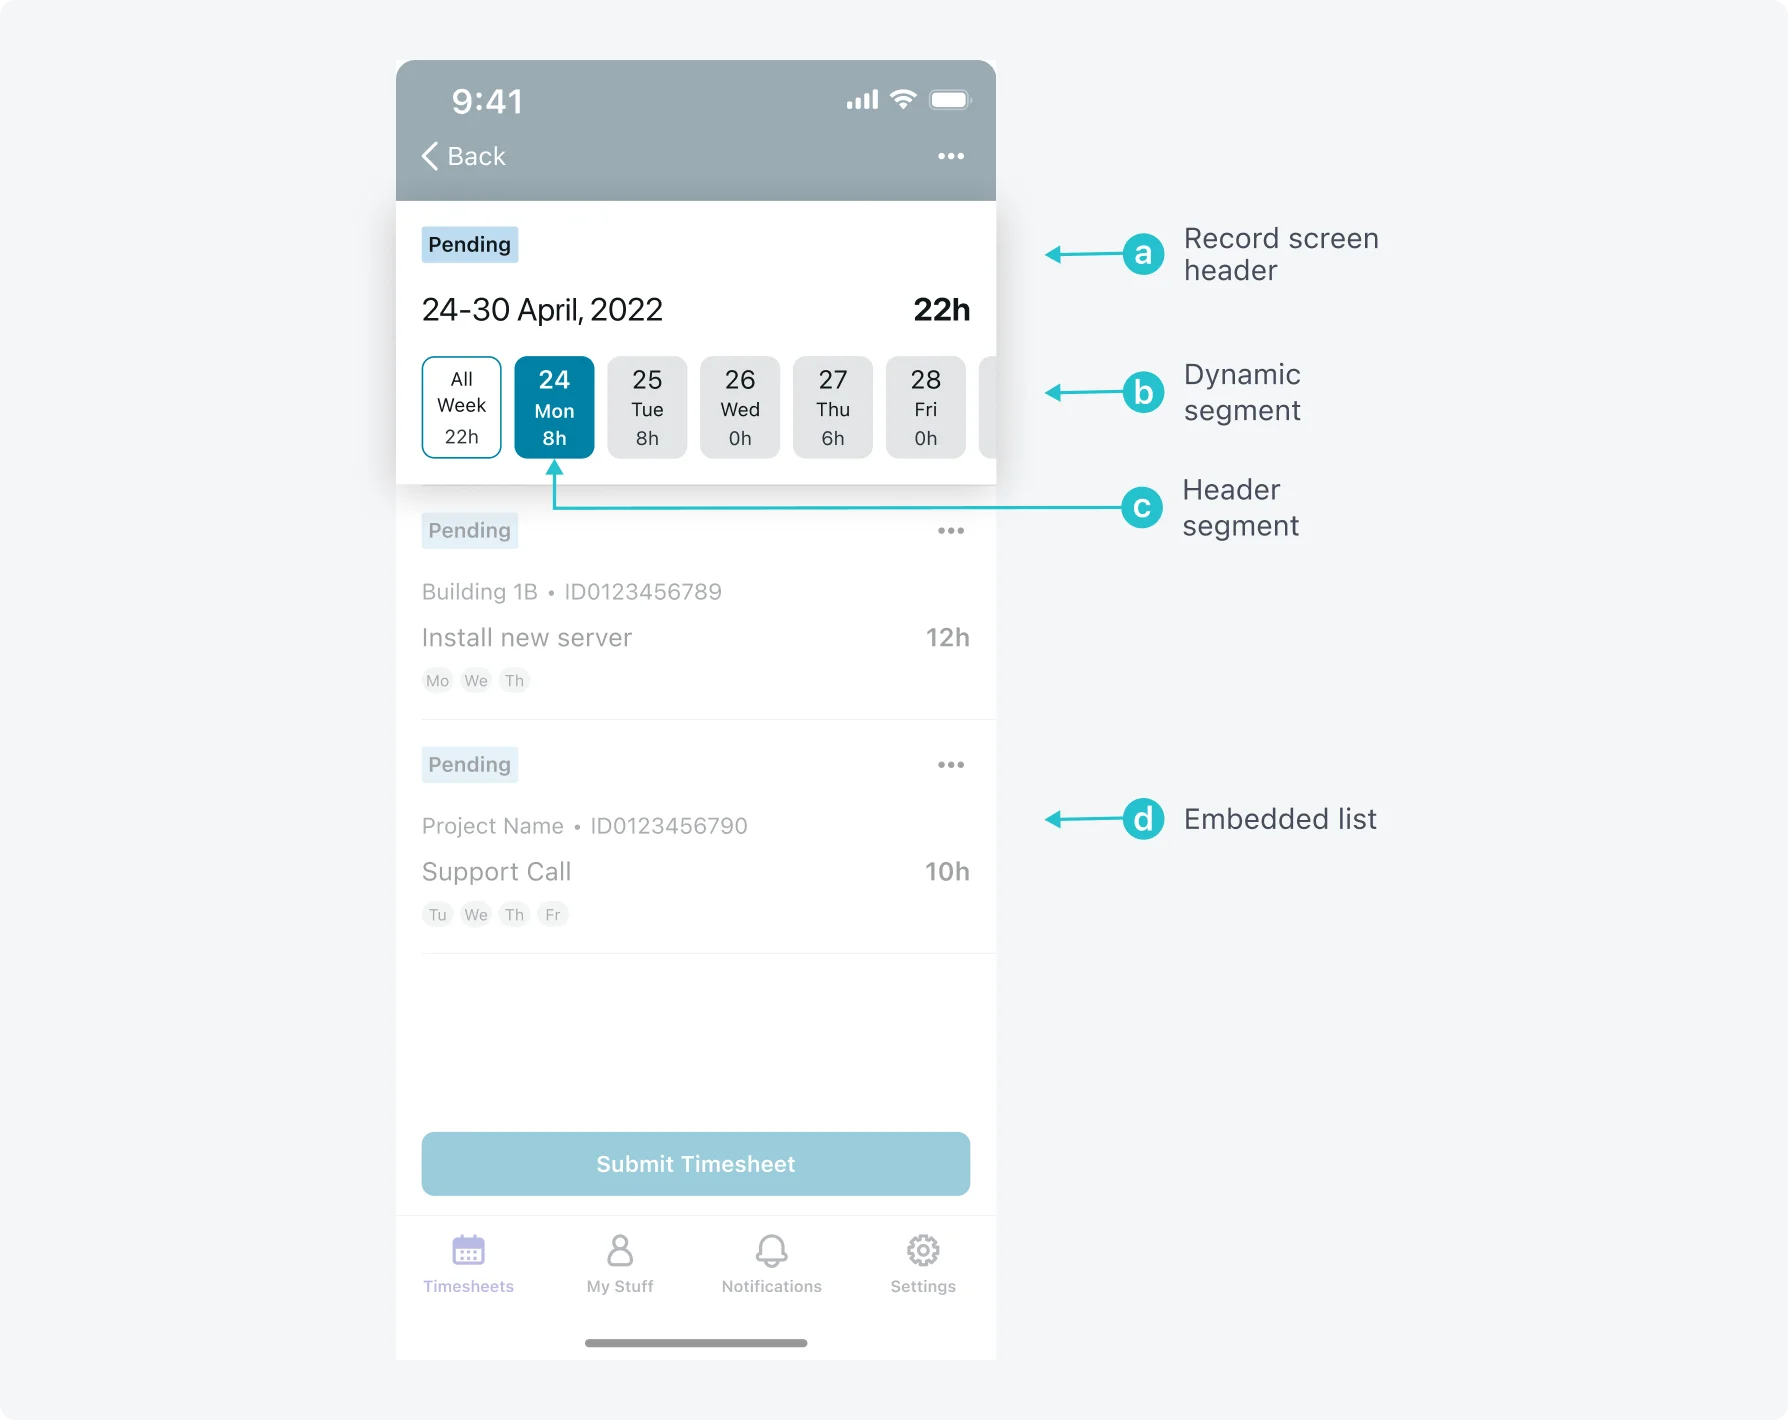
Dynamic segments
The record screen supports dynamic segments. Unlike static segments, dynamic segments display a subset of relevant records, rather than a whole list of records. Tapping a segment creates a dynamic link between the elements at the top of the screen and the contents displayed below.
For example, dynamic segments can be useful to build a timesheet experience where each segment represents a day of the week and shows the number of hours logged each day.
You can define the height and width of segment buttons to be small\ medium\large and define the card to achieve the needed design.
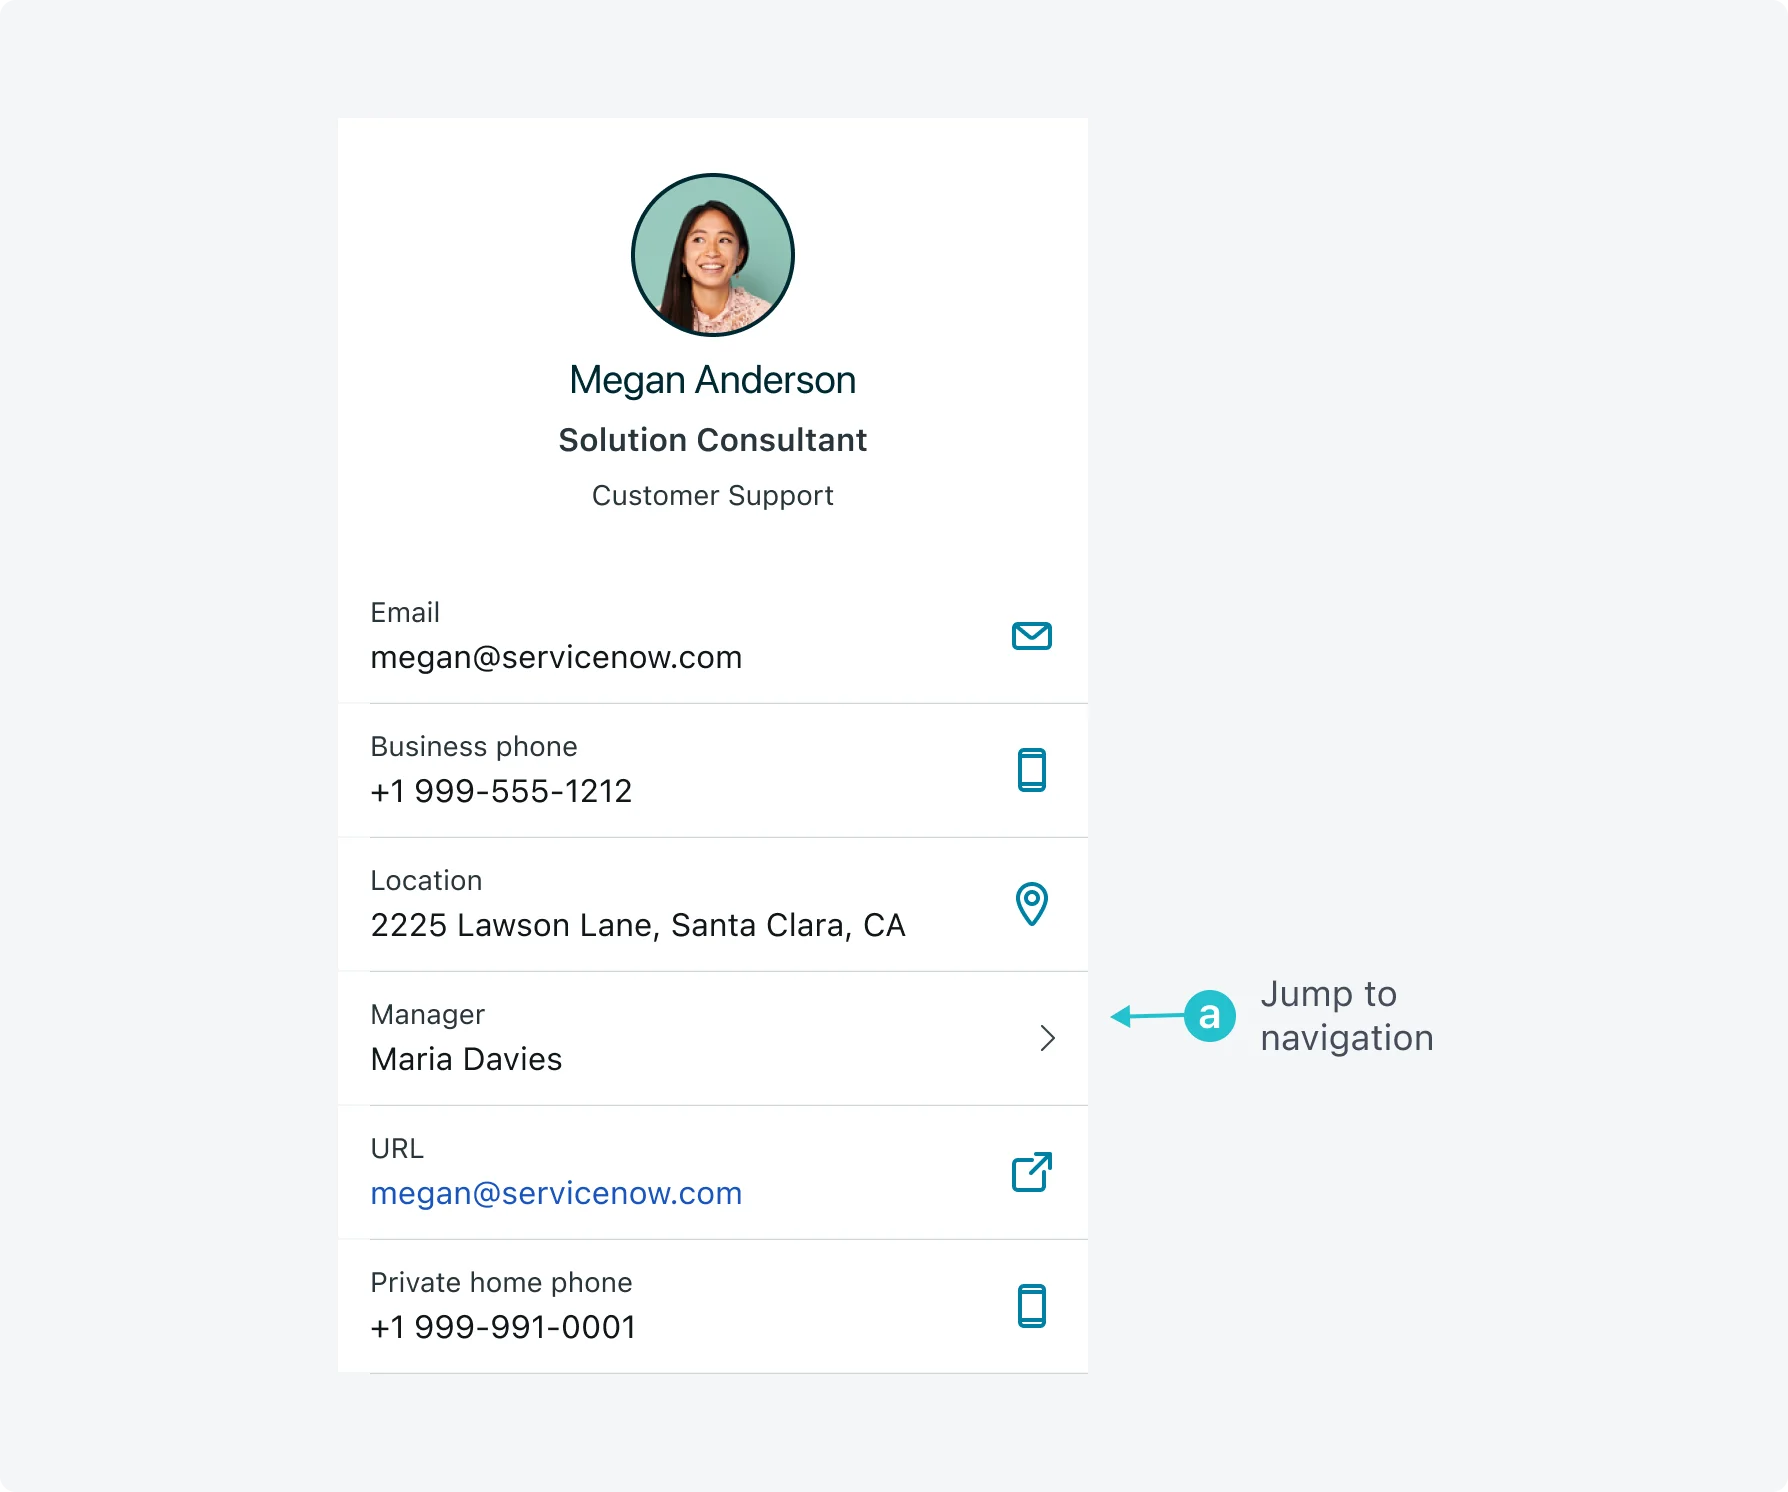
Jump to navigation
Use Jump to navigation when you want the user to navigate to a related record using a parameter. Navigation can be powerful for drilling down to see further information. For example, while in a user’s profile record, having a navigation function that jumps to their manager.
When using jump to navigation, limit the level of drill downs to 3 - 4. Avoid looping the application.
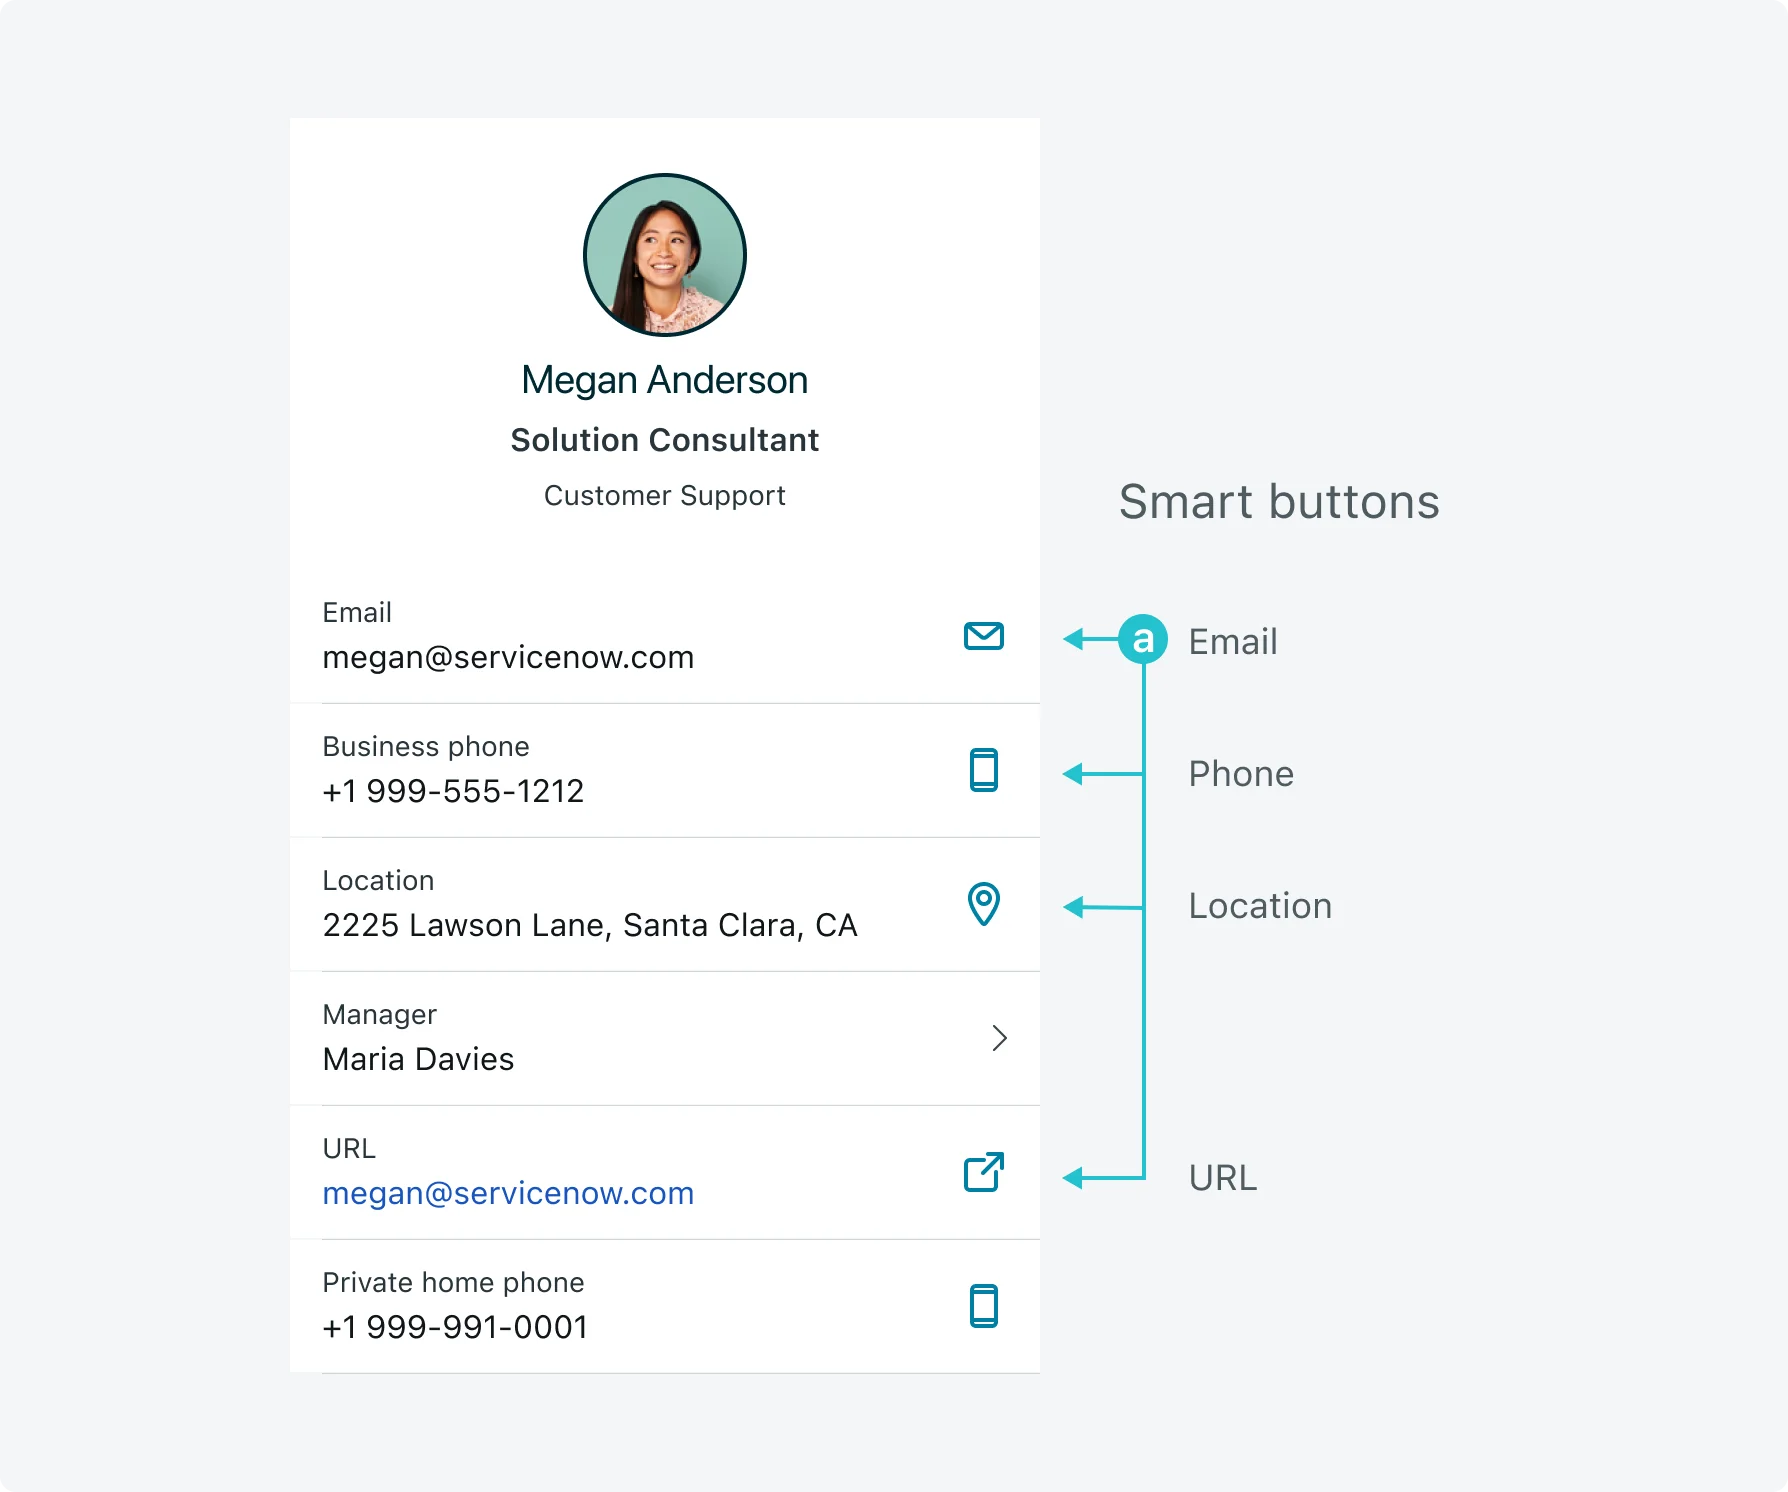
Smart buttons
Smart buttons can be used to utilize a field’s data directly from the app. For example, a phone icon to dial a number or send an SMS or a URL link to navigate outside of the application.
Access control
You can restrict access to the Record Screen for specific users by assigning User Roles. Learn more.